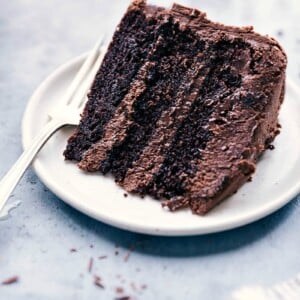
Chocolate Cake is a chocolate lover’s dream—three layers of moist, rich cake frosted with a luscious triple-chocolate buttercream icing.

The Best Chocolate Cake
Chocolate is a big deal at my house, and over the years, I’ve shared tons of chocolate-packed recipes (Oreo Balls and Icebox Cake are site favorites). It’s about time I shared a truly delicious chocolate cake recipe.
Today, I’m finally sharing the best homemade cake I’ve ever had—courtesy of Maria and Josh from Two Peas and Their Pod.
They recently released their cookbook, Two Peas & Their Pod, and if you don’t have a copy yet, you need one! This recipe comes straight from it.

The Cocoa Powder Matters
The key to a great Chocolate Cake is high-quality Dutch-process cocoa powder. The better the cocoa, the better the cake!
This is my favorite cocoa powder, and it’s what I use in this chocolate cake recipe.
Quick Tip
Dutch-process cocoa is darker, richer, and usually paired with baking powder. Using the right cocoa makes all the difference!
Lets Talk Cake Pans
I tested this cake in 8- and 9-inch pans, and the larger size caused sinking. Stick to 8-inch pans for best results—these are the ones I use.
Since this cake is extra fudgy, line the pan with parchment to prevent sticking. Here’s an easy way to cut a perfect circle for your chocolate cake:
- Fold a parchment sheet in half twice.
- Fold into a triangle, then once more.
- Trim where it meets the pan’s edge.
- Unfold and press into the pan.

How To Get Even Cake Layers
For even, well-baked layers in a layered cake, divide the batter equally.
The easiest way? Weigh each pan with a kitchen scale and adjust as needed to ensure your chocolate cake layers are even!
Chocolate Cake Tips
- Use good chocolate: Better chocolate means better flavor! I love Ghirardelli® or Guittard® for buttercream and Lindt® dark chocolate with sea salt for toppings.
- Use the right amount of flour: Lightly scoop and shake off extra to avoid heavy, dry cake. Here’s a video on how to do it.
- Don’t overbake: A few extra mins can dry it out, so keep an eye on it.
- Cool completely: Let cakes sit in the pan for 30 mins, then move to a cooling rack. Frost only when completely cool.

Storage
Chocolate Cake Storage
Finished Cake: Keep at room temp, wrapped in plastic or under a cake dome, for up to 3 days. Frosted cake doesn’t freeze well.
Make Ahead/Freezing: Wrap cooled layers in plastic wrap. Refrigerate up to 2 days or freeze up to 1 month.
More Delicious Desserts
- Chocolate Pudding Pie no baking required!
- Chocolate Muffins bakery style
- Chewy Chocolate Chip Cookies with a “secret” ingredient
- Oatmeal Chocolate Chip Cookies reader favorite!
- Pumpkin Coffee Cake with a streusel and glaze
Chocolate Cake
Equipment
- 3 cake pans 8-inch
- Cake stand
Ingredients
- Cooking spray
- 1 cup buttermilk at room temperature
- 1/2 cup vegetable oil or canola oil
- 1 tablespoon vanilla extract
- 1-3/4 cups all-purpose flour
- 2 cups granulated sugar
- 3/4 cup Dutch process cocoa powder see note 1
- 2 teaspoons baking soda
- 1 teaspoon baking powder
- 1 teaspoon salt
- 2 large eggs at room temperature
- 1 cup very hot water see note 2
- 32 tablespoons unsalted butter at room temperature, 2 cups
- 7 cups powdered sugar sifted
- 1 cup Dutch process cocoa powder
- 1/4 cup + 2 tablespoons full-fat chocolate milk or regular milk or heavy cream, at room temperature
- 2 teaspoons vanilla extract
- 1/4 teaspoon salt
- 2/3 cup semisweet chocolate chips melted and slightly cooled
- Decoration toppings as desired see note 3
Instructions
- Preheat oven to 350°F. Grease three 8-inch round cake pans generously with cooking spray. Line the bottom of the pans with parchment paper (see note 4), then spray the parchment paper with the cooking spray. Set pans aside.
- In a medium bowl, whisk together buttermilk, oil, and vanilla.
- In the bowl of a stand mixer fitted with the paddle attachment, mix together flour, granulated sugar, cocoa powder (see note 1), baking soda, baking powder, and salt. With mixer on low speed, add buttermilk/oil mixture. Add eggs, one at a time, and mix until well combined. Slowly add in hot water (it makes cocoa powder more flavorful) and stir just to combine, scraping down the sides as necessary. Do not overmix the batter or it will become dense.
- Divide batter evenly among the three prepared pans and bake for 24–28 minutes or until a cake tester comes out clean when inserted into the centers of the cakes. (My cakes are always done at 24 minutes.)
- Set cakes on wire cooling racks to cool in the pans 30 minutes, then transfer cakes to racks to cool completely. (You can refrigerate or freeze the cakes at this stage.) Do not frost cakes until they are completely cool.
- In the bowl of a stand mixer fitted with the paddle attachment, beat butter until creamy and light in color, about 3 minutes. Scrape down the bowl halfway through. Add powdered sugar (2 cups at a time), then the cocoa. Mix on low speed until just incorporated. Pour in chocolate milk, vanilla, and salt. Still on low speed, add melted chocolate chips. Mix an additional 2–3 minutes, until buttercream is light and fluffy.
- If cake layers are slightly domed on top, carefully level them off with a sharp serrated knife or cake leveler. To build the cake, place a tiny bit of frosting in the center of your cake stand (to keep the cake from sliding). Then place the first layer, bottom side up, on a flat plate or cake pedestal. Using a knife or offset spatula, spread the top of the cake evenly with buttercream. Place the second layer on top of the first, top side up, and spread more buttercream evenly over the top. Repeat with the third layer and frost the top and sides of the cake. If desired, decorate with chocolate shavings, sprinkles, or chocolate chips. Slice and serve.
Video
Recipe Notes
- Tear off a sheet of parchment slightly larger than the cake pan.
- Fold the parchment in half.
- Then fold the parchment in half again.
- Fold into a triangle.
- Fold the triangle in half again.
- Hold the triangle against the bottom of the pan from the center outwards.
- Cut the parchment right where it meets the edge of the cake pan, along the curve of the cake pan.
- Unfold the parchment and press into the bottom of the cake pan.
Nutrition
Nutrition information is automatically calculated, so should only be used as an approximation.


This was the absolute best chocolate cake I’ve ever had and the best cake I’ve ever made, hands down. It is tradition for me to bake the cake for family member’s birthdays. I made this one for my step-dads birthday recently and it was a huge hit. People said it was the best cake they’ve ever had. The flavor, the texture and the buttercream are absolutely devine. Amazing recipe. Thank you!
I am so thrilled to hear this! Thanks so much Emily!
Can this recipe be made into
Cupcakes?
I’m so sorry, I haven’t tested this recipe in cupcake form yet. However, I do have these delicious chocolate cupcakes you can try: https://www.chelseasmessyapron.com/best-chocolate-cupcakes/
This was a huge hit for my daughter’s 12th birthday! So much so now my mom wants one for hers. Do you have instructions for cupcakes (how high to fill, temperature, time etc)?
I am so thrilled to hear this! Thanks so much Kassi! I would check out this cupcake recipe: https://www.chelseasmessyapron.com/best-chocolate-cupcakes/
The Best Chocolate Cake
I am so thrilled to hear this! Thanks Terry! 🙂
Made the cake today for Valentine’s Day and it was amazing! My wife and I agreed it was the best chocolate cake we’ve ever had. Cake was super moist and the butter cream frosting was super creamy. I used Droste Dutch cocoa and 1 1/2 tsp of both baking powder and baking soda. Perfect rise done in 24 minutes. Thank you so much for the recipe.
What a compliment! Thanks so much Terry! 🙂
Hello! Great recipe, very similar to one my husband used when he worked at the Appalachian Mountain Club in NH years ago. My cakes sunk in the middle but otherwise were moist and spongy. From what understand about Duth Process cocoa, you need more baking powder and less baking soda and thought maybe this was why. But then I wasn’t sure if it’s reversed here because of the buttermilk. I’m hoping you can advise this novice baker!