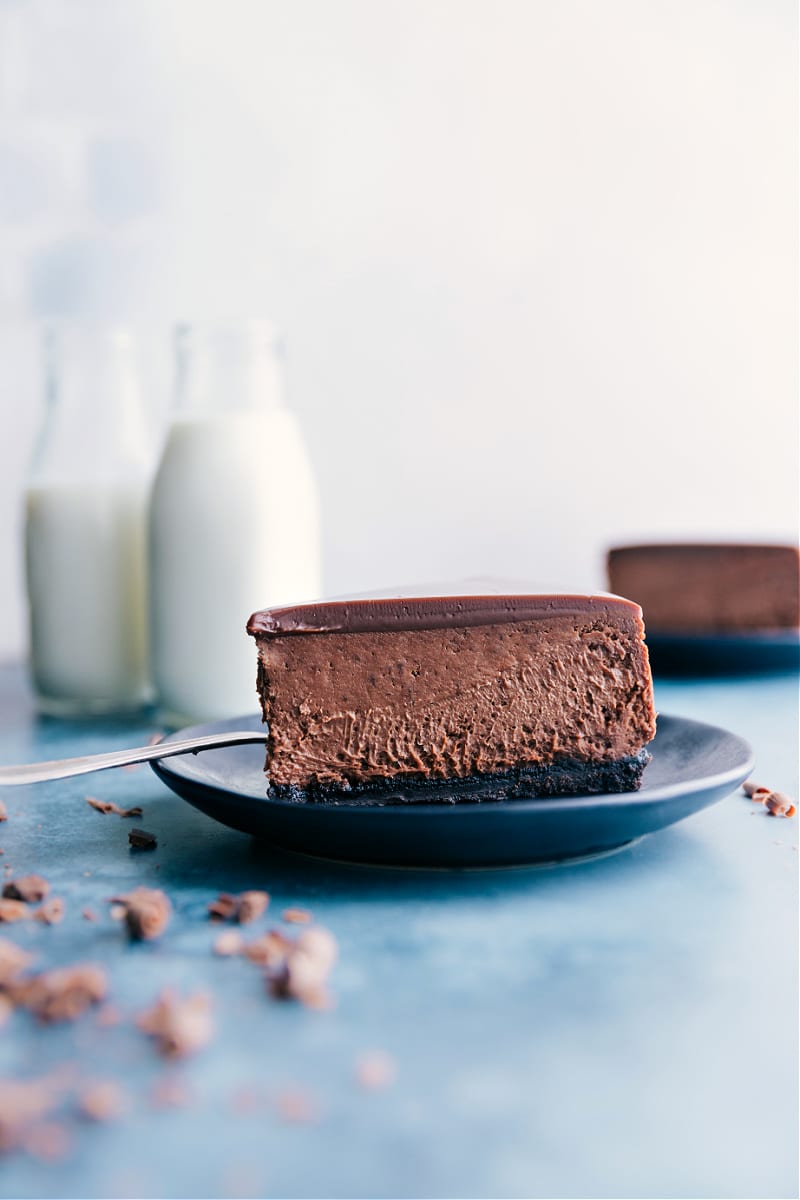
The ultimate rich and fudgy Chocolate Cheesecake has an Oreo cookie base, smooth chocolate interior, and a simple ganache topping.
We love cheesecake! Try some of our other cheesecake recipes next: Oreo Cheesecake, vanilla Cheesecake Bars, or these Mini Cheesecakes with a berry topping.
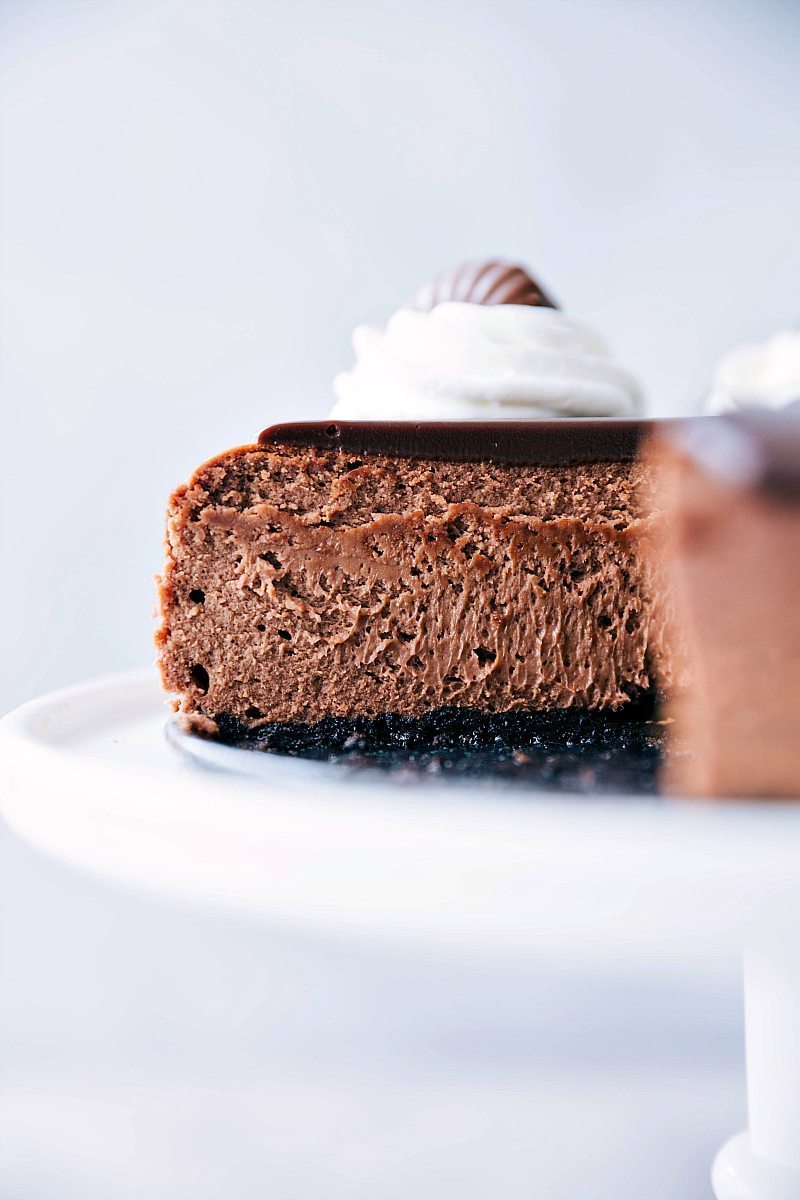
Chocolate Cheesecake
The few times I tested this Chocolate Cheesecake, it didn’t end well in terms of getting photographs…the boys were far too anxious to wait for a photoshoot.
So, to keep the boys from demolishing this Chocolate Cheesecake before I could snap a few photos of it, I laid the boys down for bed and then made it at night and hid it in the fridge. The next morning, I cut a few slices and while I went to grab my camera, the boys had already begun to dig in!
I’ve successfully created my own band of little chocolate lovers and I couldn’t be happier about it.
This triple chocolate cheesecake is ridiculously rich and a total dream for chocolate lovers. It’s rich, smooth, creamy, and deeply chocolate-y.
There are three components in this Chocolate Cheesecake: the crust, cheesecake filling, and chocolate ganache topping. I’ll break down each section below with my top tips for making this recipe.
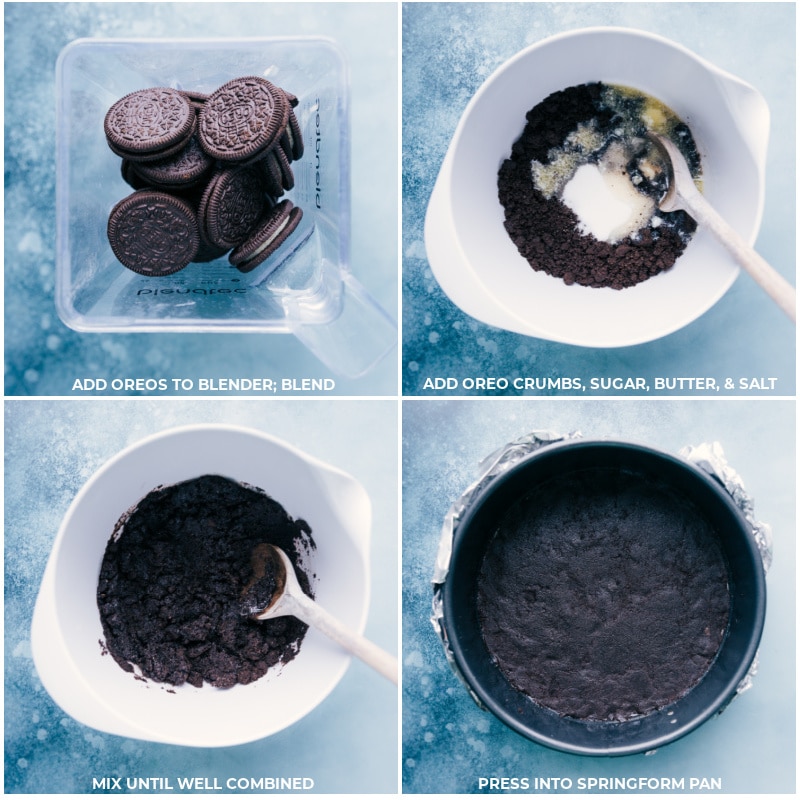
Oreo® crust
- Thoroughly crush the Oreos. If there are big pieces of the cookies in the crust, it will still taste great, but the cheesecake won’t cut and serve as nicely. I recommend a blender or food processor for crushing the Oreos. If you don’t have one of those devices, you can add all the cookies to a large plastic bag, remove any air from the bag, and break them into crumbs with a rolling pin or meat mallet.
- Leave the creme filling. There’s no need to separate creme from cookie; the creme adds structure and sweetness to the crust.
- Measure the crumbs. While it’s easiest to just add a counted amount of Oreos to the blender, there can be a good amount of variation depending on the brand of cookies used. For a fool-proof crust, measure the crumbs instead of counting out cookies. Slightly overfill the measuring cups and then level off the top with the back of a table knife for the perfect measurement.
- Don’t add hot butter to the crushed cookies. Let the butter cool slightly before mixing the two together to avoid a greasy pie crust.
- Compress the crust. I like to lightly spritz the back of a flat one-cup measuring cup with cooking spray and then use it to press the crumbs tightly to form a nice, even crust.
- Bake the crust. To ensure the crust doesn’t get too soft, we bake it before adding the cheesecake filling. While the crust doesn’t need to be cooled completely, we do want it slightly cooled before adding the chocolate cheesecake filling.
Chocolate Cheesecake Filling Tips
- Use room-temperature cream cheese: Room-temperature cream cheese becomes creamier when it is mixed and it incorporates much better with the other ingredients in this recipe. If your cream cheese is too cold, it tends to stay lumpy and the batter doesn’t fully mix. You’ll also likely be tempted to over beat the batter (which is not good for a cheesecake!) to get rid of the lumps. See “quick tip” below.
- Use room-temperature eggs: The more even the temperature of the ingredients, the better they will incorporate and the less chance you have for getting cracks in the cheesecake.
- Don’t overmix the batter: It’s important to mix the cream cheese enough to remove the lumps and to combine the ingredients sufficiently, but overmixing the batter will introduce too much air into the mixture. Too much air causes the cheesecake to rise too quickly in the oven and then fall (and cause cracks in cheesecake).
- Mix the cheesecake batter at low and consistent speeds: This reduces the risk of adding in too much air which will cause cracks on top. I recommend beating the cheesecake batter in the same direction for the duration of mixing.
- Allow the cheesecake to cool completely at room temperature: It might not seem like a big deal to speed up the chilling process of the cheesecake and put it in the fridge right out of the oven, but this will cause condensation to form on top or create cracks in the cheesecake.
Get cream cheese to room temperature quickly: Remove the cream cheese from the packaging and microwave in bursts of 15-20 seconds until it is room temperature (not softened or melted at all). Quick Tip
Chocolate Cheesecake Baking Tips
- Use a springform pan: A springform pan (a pan that has a spring to hold the sides of the pan in place) is the best for cheesecakes. Because of the final texture of the cheesecake it can’t be inverted from a pan (like a typical cake) and so the removable sides of the springform pan make it easy to keep the form and shape of the cheesecake. (Still make sure to generously grease your springform pan first).
- Wrap the springform pan with foil: Since this chocolate cheesecake bakes in a water bath (I promise it’s easy!) you’ll want to cover the outside in foil (I line it twice in heavy duty foil) to ensure no water from the water bath seeps into the cheesecake.
- Bake the cheesecake in a water bath: A water bath may sound complicated, but it simply means we put the cheesecake into a larger baking pan that is filled with about an inch of water (similar to how we make creme brulee). Why use a water bath? The water helps to evenly disperse the heat which will help to ensure your cheesecake is evenly baked. You’ll also be able to avoid the cracks in the cheesecake.
Chocolate Cheesecake Ganache Topping
The ganache adds the perfect finishing flavor touch to the best Chocolate Cheesecake. It’s also nice to have if your cheesecake did develop cracks — cover them up with this ganache and no one is the wiser!
- Use high-quality milk chocolate for best results. You’ll get both a better melt and better flavor. My favorite for this Chocolate Cheesecake is Ghirardelli® or Guittard®.
- Decorate! If the ganache doesn’t go on glossy and perfect, don’t fret! Add a garnish like chocolate curls, whipped cream, or chocolate candies
This Chocolate Cheesecake with an Oreo crust can stand at room temperature for up to 2 hours, but after that, it does need to be refrigerated. To store: Place leftover cheesecake slices in an airtight container or individually wrapped in the fridge for up to 5 days. To freeze: Tightly wrap cheesecake slices in plastic and store in an airtight container. Freeze for up to 3 months. To serve, thaw overnight in the fridge and let sit at room temperature for 20-30 minutes.Storage
Chocolate Cheesecake Storage
Quick Tip
Slice the chocolate cheesecake with a very sharp, hot knife. To get the perfect slices, you’ll want to use a large and very sharp knife. To get a perfect slice, run the knife under very hot water and dry it off with a kitchen towel. Then, make one quick and decisive cut. Repeat this process for each cut you make.
More Chocolate Desserts
- Chocolate Covered Oreo Fudge with milk chocolate chips
- Chocolate Tart with a chocolate ganache topping
- Hot Chocolate Snack Mix with chocolate-covered marshmallows
- Chocolate Cake Recipe with triple chocolate frosting
- Chocolate Rice Krispie Treats with loads of marshmallows
Chocolate Cheesecake
Equipment
- Springform pan 9-inch
- Baking pan 10 x 10-inch or larger
Ingredients
- 1-3/4 cups chocolate sandwich cookie crumbs
- 2 tablespoons granulated sugar
- 4 tablespoons unsalted butter melted
- 4 (8-ounce) packages cream cheese full-fat, room temperature
- 1 (12-ounce) package semi-sweet chocolate chips
- 1-1/2 cups granulated sugar
- 4 tablespoons cocoa powder
- 4 large eggs
- 1/2 teaspoon salt
- 1/2 tablespoon vanilla extract
- 1 cup chocolate chips
- 1/2 cup heavy cream
- 1 tablespoon unsalted butter
- 3/4 cup heavy cream
- 2 tablespoons powdered sugar
- 1 teaspoon vanilla extract
Instructions
- Preheat the oven to 325℉. Wrap a well-greased, 9-inch springform pan in two layers of heavy-duty aluminum foil. Secure foil around the pan.
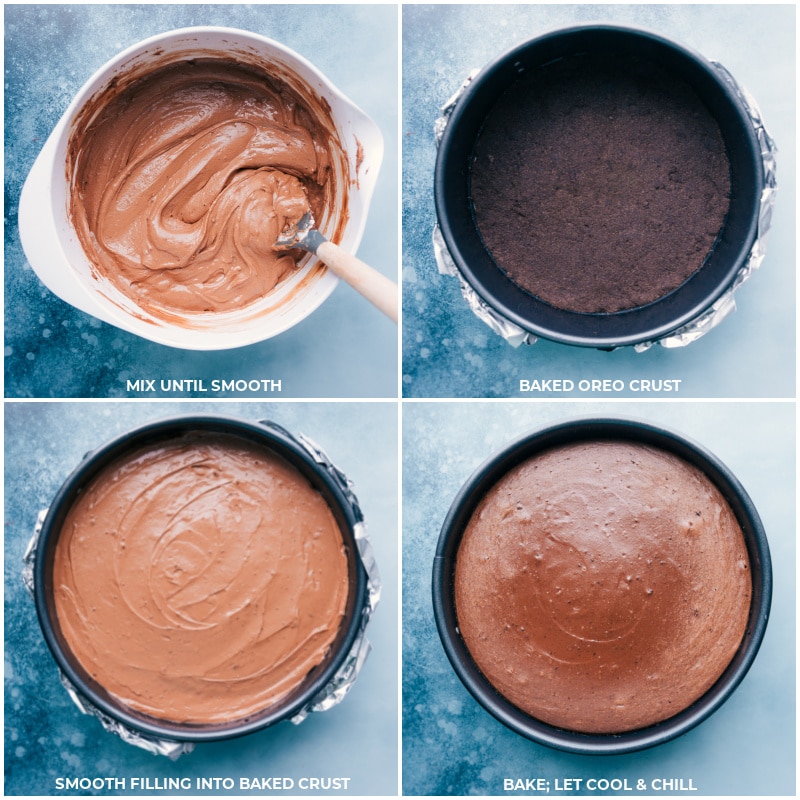
- In a small bowl, combine Oreo cookie crumbs and sugar and then stir in butter. Press firmly into the bottom of the greased and prepared springform pan—don't go up the sides—just press into the bottom of the pan. Place pan on a baking sheet. Bake for 10 minutes and then remove to a cooling rack.
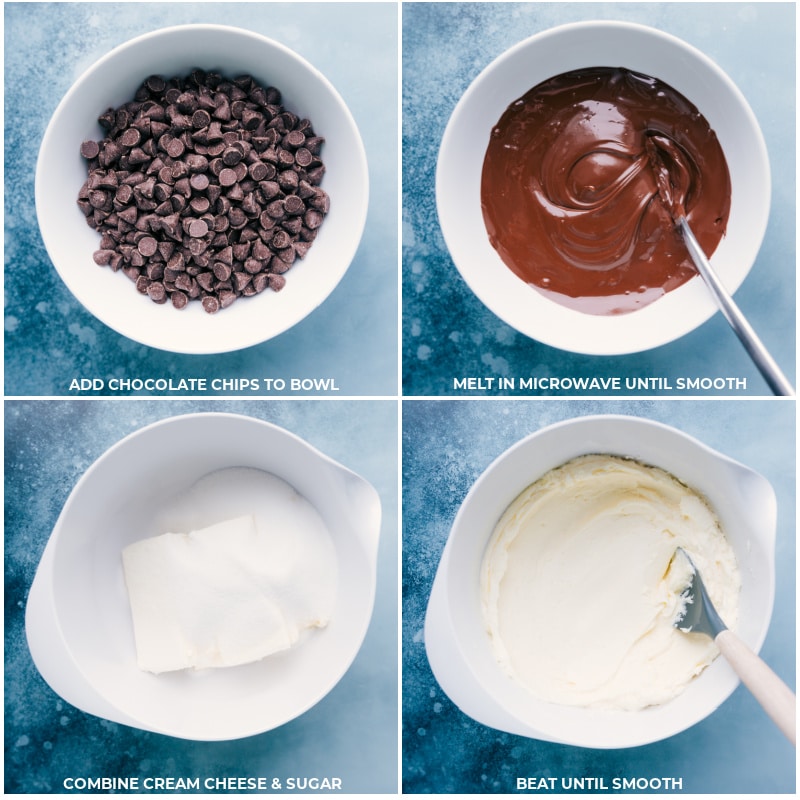
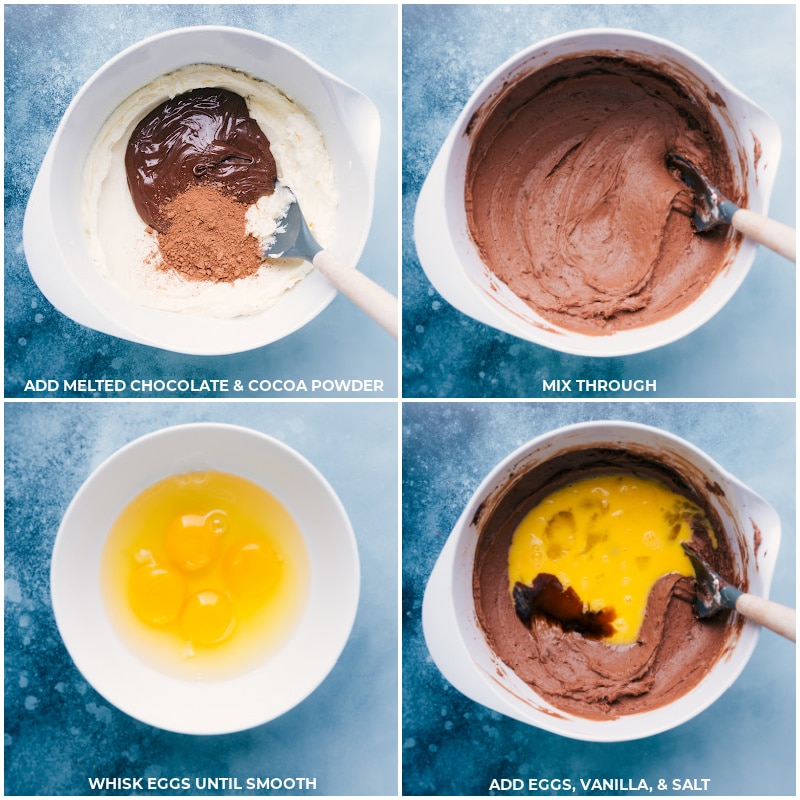
- Melt the semi-sweet chocolate chips in the microwave in bursts of 15 seconds stirring in between each burst for 10 seconds until the chocolate is melted and smooth. Allow to cool to room temperature.
- In a very large bowl, beat the room temperature cream cheese and sugar in a circular motion and with consistent medium-low speed until smooth. Be careful not to overbeat or beat too fast or your cheesecake will fall and crack after baking. Use a spatula to scrape every bit of the melted and cooled chocolate into the cheesecake filling mixture. Add cocoa powder. Beat until just combined.
- In a small bowl, whisk the eggs together. Add them to the filling mixture along with salt and vanilla extract. Beat on low speed until just combined. Use a spatula to scrape every bit of this mixture on top of the Oreo crust in the springform pan. Smooth the top of the cheesecake with the spatula. Place the springform pan in a large baking pan and add 1 inch of boiling water to the baking pan.
- Bake the cheesecake at 325℉ for 55–70 minutes, or until the center is set and the top is no longer shiny. The center should have a slight jiggle, as it will firm up as it cools. If it jiggles a lot, it needs more time—check again in 5 minutes. Once fully baked, turn off the oven and open the door completely. Carefully pull the oven tray with the cheesecake out and let it cool in the water bath for 45 minutes. Afterward, remove it from the water bath, carefully take off the foil, and let it sit at room temperature on a wire rack for 30 minutes. This gradual cooling helps prevent cracks. Finally, cover the cheesecake and transfer it to the fridge to chill for at least 8 hours, preferably overnight.
- Place chocolate for the ganache in a small bowl with the butter and heavy cream. Microwave in bursts of 20 seconds, stirring in between each burst for 10 seconds until the mixture is smooth. Let stand until it has cooled to room temperature before topping the cheesecake with the ganache. Spoon the ganache into the center of the cheesecake, keep it about an inch away from the edge, and smooth the ganache with the back of the spoon. Cover ganache-topped cheesecake and place in the fridge for an hour or until fully set.
- When ready to serve, combine the heavy whipping cream, powdered sugar, and vanilla extract in a stand mixer. Beat on high until soft peaks form and then spoon or pipe the whipped cream over the cheesecake slices.
- To get the perfect slices, you'll want to use a large, very sharp knife. Run the knife under very hot water, dry it off with a kitchen towel, and then make one quick and decisive cut. Repeat this process for each cut you make.
Video
Recipe Notes
- Use room-temperature cream cheese. Room-temperature cream cheese becomes creamier when it is mixed, and it incorporates much better with the other ingredients in this recipe. If your cream cheese is too cold, it tends to stay lumpy, and the batter doesn’t fully mix. You’ll also likely be tempted to overbeat the batter to get rid of the lumps which is not good for the cheesecake.
- Use room-temperature eggs. The more even the temperature of the ingredients, the better they will incorporate and the less chance you have of getting cracks in the cheesecake.
- Don't overmix the batter. It’s important to mix the cream cheese enough to remove the lumps and to combine the ingredients sufficiently but overmixing the batter will introduce too much air into the mixture which causes the cheesecake to rise too quickly in the oven and then fall and create cracks in the cheesecake.
- Mix the cheesecake batter at low and consistent speeds. This reduces the risk of adding in too much air which will cause cracks on top. I recommend beating the cheesecake batter in the same direction for the duration of mixing.
- Allow the cheesecake to cool completely at room temperature. It might not seem like a big deal to speed up the chilling process of the cheesecake and put it in the fridge right out of the oven, but this will cause condensation to form on top and change the texture of your cheesecake.
Nutrition
Nutrition information is automatically calculated, so should only be used as an approximation.




I made this recipe last weekend for my grandmother’s birthday. I did the filling exactly as above, but I did a variation by topping with homemade raspberry mousse and raspberry gelee. This was my first attempt at ever making a baked cheesecake and it turned out AMAZING. I thought I didn’t even like cheesecake, but this was absolutely decadent; unctuous! The extra time is absolutely worth it. Best chocolate cheesecake I’ve ever tasted.
So thrilled to hear that!! Thanks so much for the comment and review Cori 🙂
The cheesecake is excellent and very smooth. I followed the directions exactly and it came out just right. Getting the the cream cheese and eggs to room temperature makes a difference.
Will make again!
So thrilled to hear that!! Thanks for the comment James 🙂
The recipe calls for cocoa powder. Would it make an difference if I substitute it for Dutch cocoa powder instead to add an richer taste?
Dutch process cocoa should be fine in this recipe 🙂 Enjoy!
I have made part of the cheesecake recipe and it looks amazing. Will be making the ganache a little later. I did have a question. Can I freeze it for a day after I add the ganache? If so, does it thaw easily?
Made this for Thanksgiving, and it was a delicious, huge hit! Do you know how I might be able to make it adding grand marnier (as in a chocolate grand marnier cheesecake)? Thank you!
SO happy to hear that! 🙂 Thanks for the comment Eva! 🙂 I wish I could be of more help, but baking can be finicky sometimes and without testing myself I’m really not sure how adding grand marnier (or how much to add) would affect the cheesecake. Wish I could be of more help!
Reviews of recipes are supposed to be done AFTER YOU’VE MADE THE RECIPE. Sheesh. So many people giving 5 stars after not even having tried this.
You have a five star rating on this but yet not one person who wrote a review actually has made the cheese cake that’s not a real review.
Sorry Debbie, my comment approval on the back-end only lets me approve a comment, I don’t have access to remove or change ratings. If you try this I’d love to hear your review! 🙂
Really. I ACTUALLY made this recipe and can truthfully give it a 5 star rating. For the life of me, I cannot understand the basis of rating a recipe by ? reading it or ? looking at the pictures? I followed the recipe to a T and the tips as well. I was, however, afraid of water seeping in if I used through foil pieces and used slow cooker liners instead. I got this tip from another site and they work well. Final words: Pure rich chocolate decadence.
So happy you enjoyed the cheesecake! 🙂
I’m in the uk and will be making this cheesecake this weekend. Could you please convert the amounts of stuff needed to uk measurements. Thanks
Thanks for sharing! I had some leftover peanut butter cookies that I had make a few nights ago, so I used them for the crust. Had a great peanut butter chocolate cheesecake. Your tips were super helpful!
That sounds delicious! I need to try it! I’m so glad you enjoyed! 🙂
Cheesecake seems to be soft and not done. Used butter knife to loosen from springform pan and soft mixture on knife
It sounds like you needed to bake a bit longer!