Golden Oreo Truffles are one of the easiest treats to make — no-baking required! Dip them in melted chocolate and decorate them however you’d like — these pop-able treats can be made ahead of time and keep well in the fridge for several days.
If you want to use regular Oreos instead, check out our Oreo Balls (also known as Oreo Truffles) recipe! I’m a chocoholic through and through, but I have to admit, Golden Oreos are right up there with Chocolate Oreos in my book. So, why not convert a favorite chocolate dessert (Oreo balls) into a delicious vanilla treat?!

Golden Oreo Truffles
I recently served these at a party and had so many people comment that these were the very best “cake balls” they’d ever had. Without knowing the base is Oreos, they actually do taste like cake balls–except way tastier!
If you’ve never completely loved cake balls, give this recipe a try, you may just find a new favorite treat!
Note: Oreos and Golden Oreos are trademarked products produced by Mondelez International. For this recipe, any type of chocolate and vanilla sandwich cookies can be used.
Quick Tip
These are amazing as a treat on their own, but if you want a really fancy-looking dessert spread, prepare a platter of these Golden Oreo Truffles and regular Chocolate Oreo Truffles. The two together makes for a stunning presentation.
How to make Golden Oreo Truffles
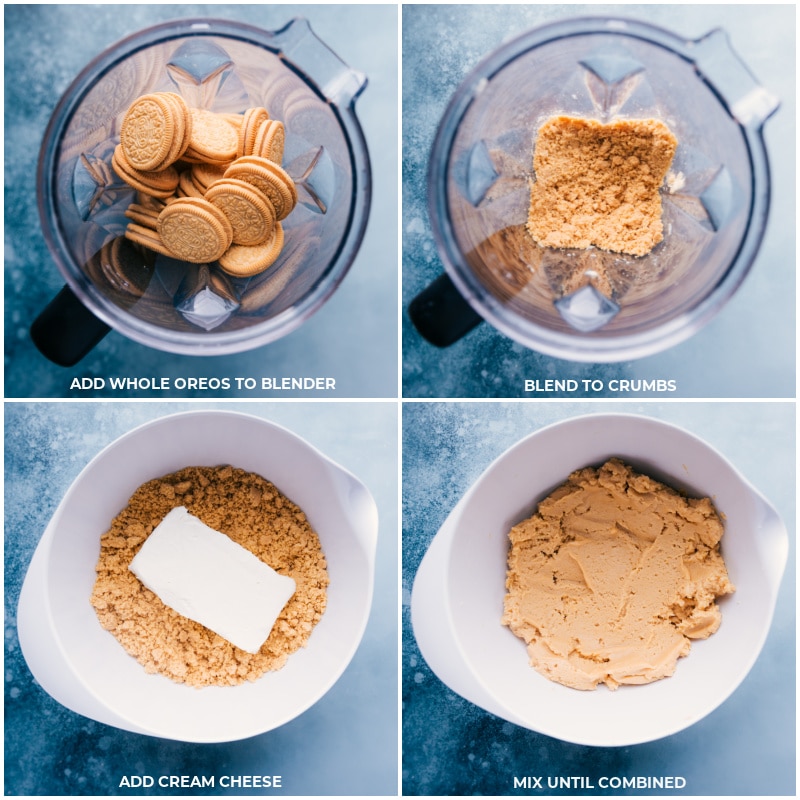
- Start by crushing the cookies. Make sure the Oreos are finely crushed; big chunks of cookie will mess up the texture of these truffles. By the way, no need to separate creme from cookie– we blend it all together for this recipe!
- Mix the cream cheese and cookie crumbs. We’re looking to get a thick and slightly sticky dough. You can knead the mixture with your hands, or a mixer.
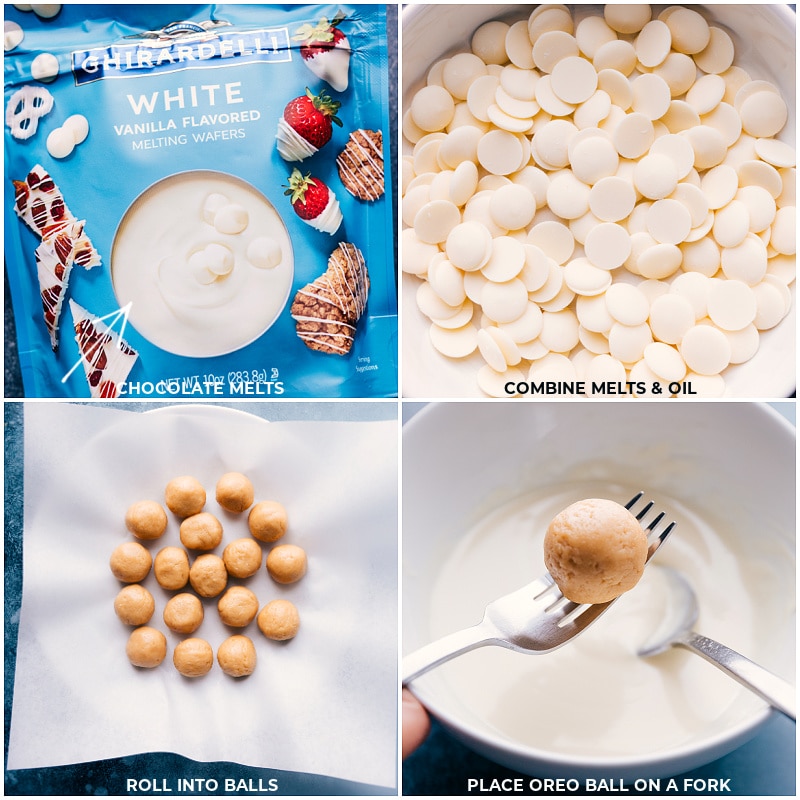
- Roll into balls. Use a tablespoon measuring spoon to portion out dough and roll into a ball. Sometimes the “dough” is a bit too sticky/oily to roll out initially. A quick chill in the fridge will make rolling much easier!
- Place the balls on a tray and refrigerate. This makes them much easier to dip! Once the balls are firm, it’s time to dip them in melted chocolate.
- Melt chocolate and dip! We like to use the microwave to melt the chocolate for dipping. Decorate if desired and then let harden before enjoying.
Golden Oreo Truffle Ingredients
- Family-size Golden Oreos. For our chocolate Oreo balls recipe, we use a standard-size package of Oreos, but when using the vanilla Oreos, we found that a family-size package works the best. With the regular-sized package of Oreos, the mixture was a little too wet/soft. (This recipe will still work with the smaller package of Oreos, but is easiest/best with the larger package.)
- Cream cheese. Be sure to use full-fat, brick-style cream cheese. Lower fat and tub cream cheese don’t work the same here.
- White Chocolate Melting Wafers. While a lot of truffles/Oreo ball recipes will call for expensive baking bars, I find it isn’t necessary here. A good brand of white chocolate wafers still taste rich and indulgent, but ultimately, so much easier to work with. Plus, you don’t need to mess with chopping the chocolate. I think you’ll be amazed at how simple the process is with these wafers!
- Coconut oil: I like to add a touch of oil or shortening to the chocolate. It helps to smooth out the chocolate and make dipping easier. If you find the chocolate is too thick and won’t coat the truffles nicely, add a touch more oil.
Quick Tip
Here’s how we like to dip the Golden Oreo Truffles: Dip a fork in the melted chocolate then place a chilled ball on top of the fork. Use a spoon to pour melted chocolate over the ball. Tap that fork against the bowl a few times to smooth the chocolate and then slide the fork against the edge of the bowl to remove excess chocolate. Use a table knife to gently slide the ball off the fork and onto a parchment-lined tray to harden.
Decorate ‘Em! (Optional)
Jazz up these Golden Oreo Truffles if desired, with one of the following ideas:
- Add on a drizzle of milk, semi-sweet or dark chocolate. If you want a distinct chocolate drizzle, add the drizzle once the white chocolate has set up. If you want the chocolate to “bleed” into the white chocolate, add the chocolate drizzle immediately after dipping the ball in white chocolate.
- Add some finely crushed Oreo crumbs to the top of the Golden Oreo Truffle. Add while the chocolate is still wet so the crumbs stick.
- Sprinkle mini chocolate chips, crushed nuts or sprinkles on top.
Quick Tip
White chocolate hardens quickly, so be sure to have decorations out and ready to add as soon as the truffles are dipped!
Storage
Storage
These Golden Oreo Truffles have cream cheese in them, so they need to be refrigerated when not being served. If left out for an extended period of time, they will be unsafe to eat. These store nicely in an airtight container in the fridge for 5-7 days.
More Desserts That Don’t Require Baking:
- No Bake Brownie Bites with a chocolate coating
- Muddy Buddies chocolate and peanut butter snack mix
- Trail Mix Five different recipes!
- Edible Cookie Dough without eggs!
- Chocolate Covered Strawberries with a chocolate drizzle

Golden Oreo Truffles
Equipment
- Blender or food processor
- Hand mixer or stand mixer
Ingredients
- 1 (18.12-ounce) package Golden Oreos 48 cookies (family-sized package), finely crushed, see note 1
- 1 (8-ounce) package cream cheese full-fat, brick-style, at room temperature
- 1 (10-ounce) package white chocolate melting wafers about 2 cups, see note 2
- 2 teaspoons coconut oil optional
Instructions
- Place whole Golden Oreo cookies (don’t separate cookie from creme) in a blender or food processor. Pulse until they are fine crumbs. Ensure there are no large pieces and transfer to a large bowl or stand mixer.
- Add the softened cream cheese (should not be too cold but shouldn’t be melted at all—room temperature is perfect) to the Oreo crumbs. Using a hand mixer or the whisk attachment on a stand mixer, beat until ingredients are well combined and smooth. (If you don’t have a mixer, knead with your hands until smooth and combined.)
- Use a 1-tablespoon measuring spoon to measure out even-sized dough balls. (If mixture is too wet and hard to shape, chill the mixture, uncovered, for 15–20 minutes). Place balls on a large lined sheet pan and chill for another 15 minutes. You should get around 36 balls.
- When the balls are almost done chilling, add the white chocolate melts and 2 teaspoons coconut oil to a microwave safe bowl. Melt in the microwave in bursts of 30 seconds, stirring between each burst for 15 seconds (see note 3). Be patient microwaving to avoid burning the chocolate—the chocolate is melting outside of the microwave.
- Once melted and smooth, coat the cookie balls in the chocolate. I dip a fork in the chocolate, then take a ball from the lined pan and place it on the dipped fork. With my other hand and a spoon, I spoon the melted chocolate over the fork. I tap the fork a few times to get the chocolate smooth and drag the fork across the edge of the bowl to remove excess chocolate. I use a knife to push the ball off the fork and back onto the lined sheet pan. Repeat until all the balls have been dipped. Allow dipped truffles to harden at room temperature (not fridge/freezer). See note 4 for troubleshooting.
- If desired, add any toppings before the chocolate sets (work quickly—white chocolate hardens fast!) Let set and they’re ready to enjoy! Store any leftovers in an airtight container in the fridge for up to a week.
Video
Recipe Notes
Nutrition
Nutrition information is automatically calculated, so should only be used as an approximation.






Can you freeze these after they are made?
I’d freeze them before they’ve been dipped in chocolate if possible!