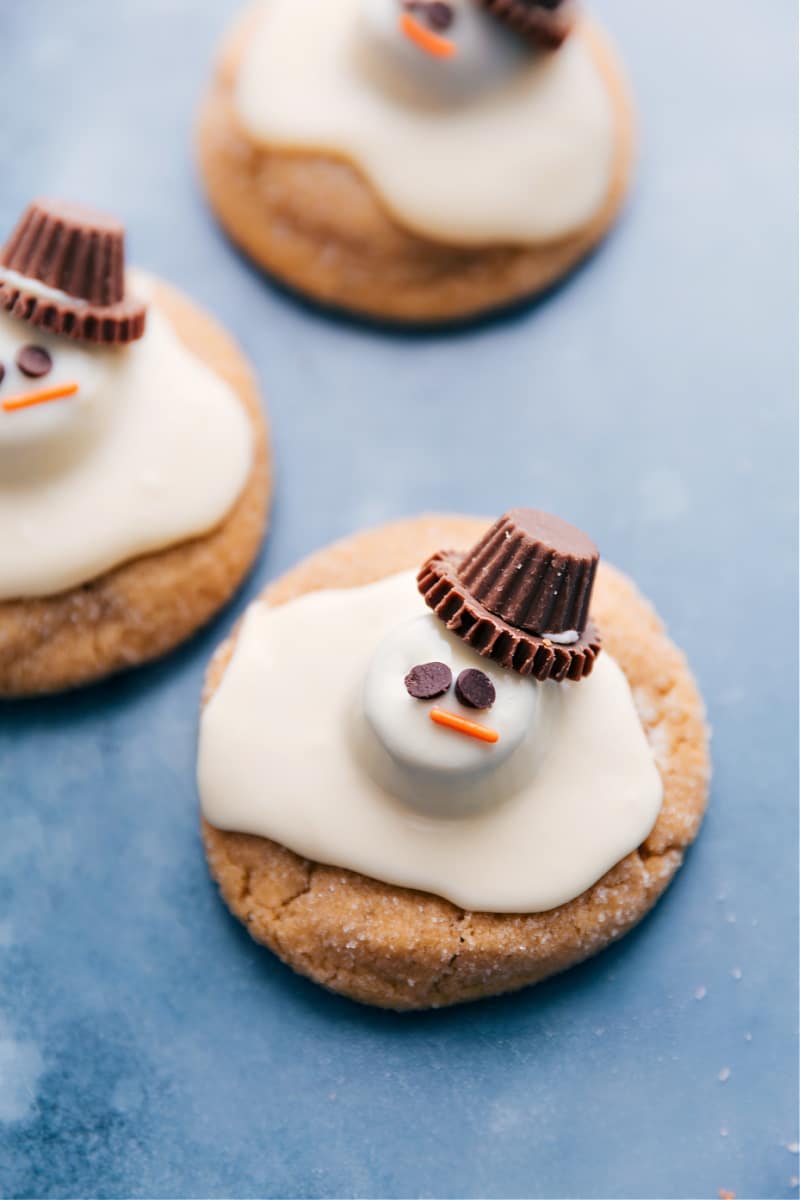
Melted Snowman Cookies are a fun, delicious winter treat! Peanut butter cookies are topped with a peanut butter cup, white chocolate, and candy for a melting snowman look.
Check out these other festive treats: Christmas Oreo Truffles, Gingersnap Cookies, or Christmas Oreo Pops!
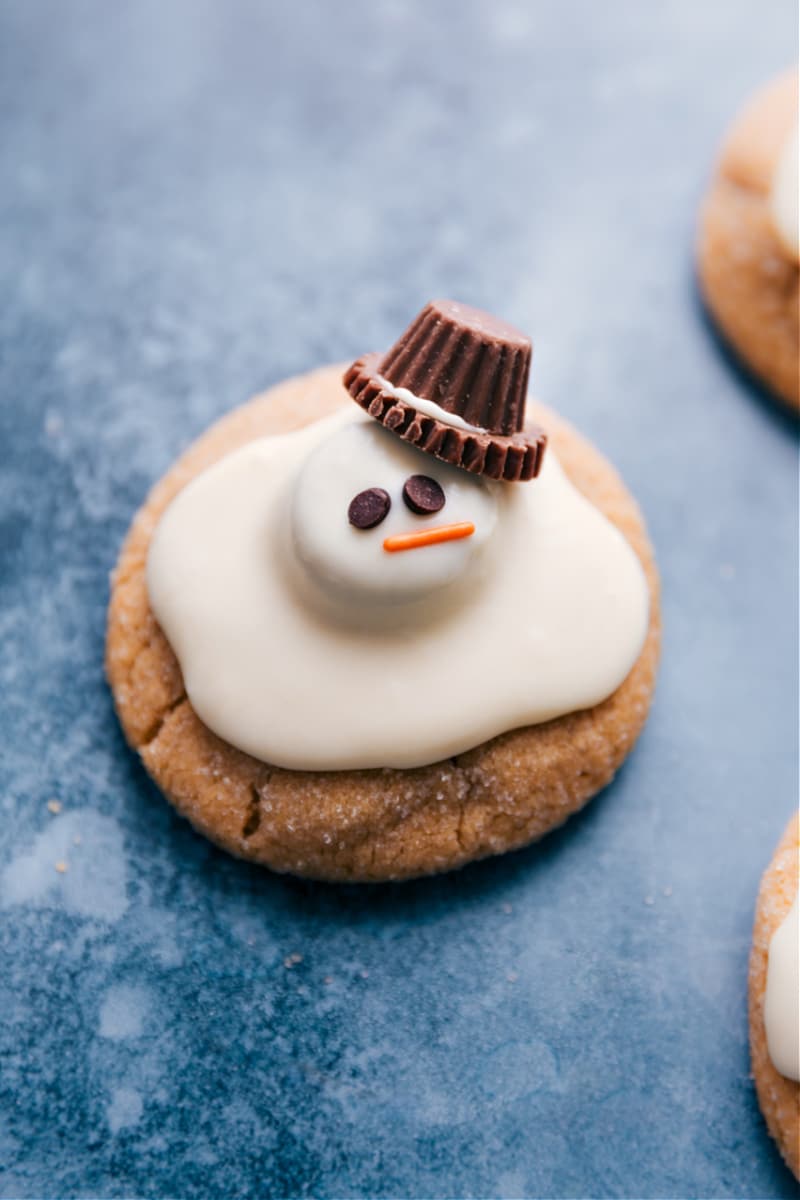
Melted Snowman Cookies
Melted Snowman Cookies aren’t new to the internet, but I’m excited to share my take! If you love chocolate and peanut butter, this is the tastiest version yet.
Most recipes use halved marshmallows for the snowman’s head, but they harden too quickly and don’t taste great. I made them last year, and while cute, they weren’t that tasty.
After brainstorming, I swapped marshmallows for peanut butter cups. They stay soft, taste amazing, and pair perfectly with peanut butter cookies (or even Chewy Chocolate Chip Cookies).
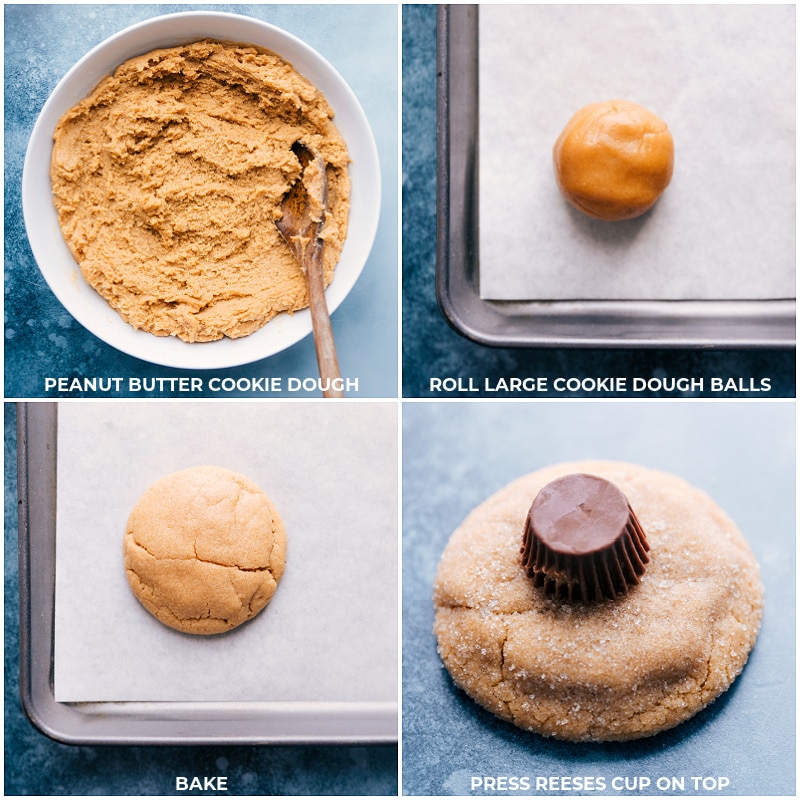
Ingredients
- Cookies: Homemade cookies for extra flavor, or save time with store-bought.
- Mini Pb Cups: Add them to slightly warm cookies so they stick.
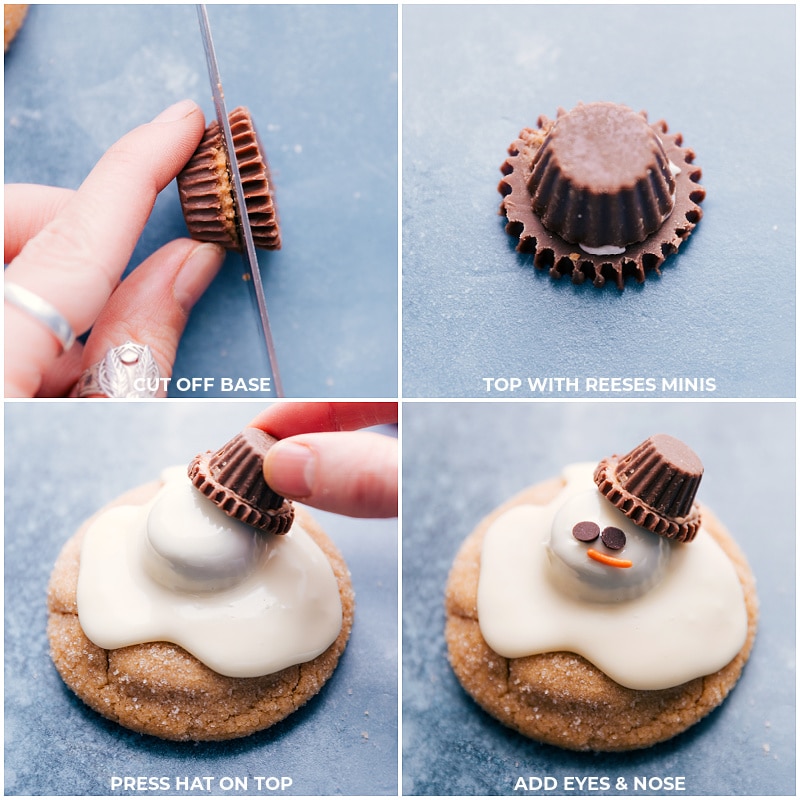
- Mini Pb Cups: Use a serrated knife warmed under hot water to cut cleanly.
- Orange Jimmies Sprinkles: These act as the snowman’s “nose.”
- Mini Chocolate Chips: Press them in while the white chocolate is soft.
- White Chocolate Chips: Melt in short bursts and stir between to prevent overheating.
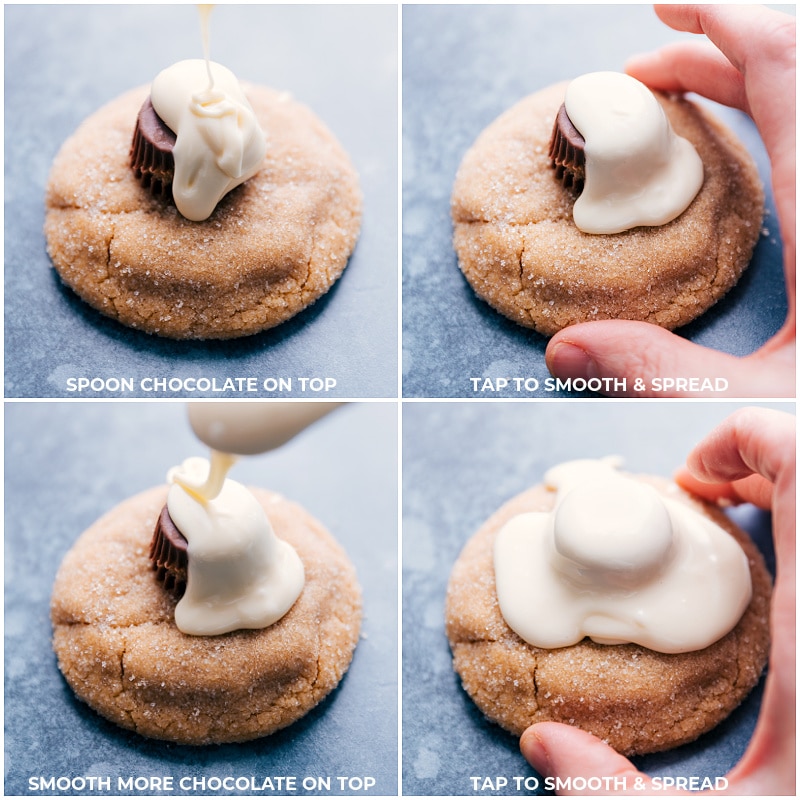
How To Make Melted Snowman Cookies
- Cookies: Use homemade or store-bought cookies. Let cool a bit.
- Snowman Heads: Press a miniature peanut butter cup onto each warm cookie.
- White Chocolate: Microwave white chocolate chips in short bursts until smooth.
- Spread: Spoon white chocolate over the pb cup to mimic melted snow.
- Hats: Attach a mini pb cup to the larger one with melted white chocolate.
- Decorate: Add chocolate chip “eyes” and an orange sprinkle “nose” while the chocolate is soft.
- Let Hard Set: Allow the cookies to cool completely so the chocolate hardens.
Melting Snowman Cookie Recipe Tips
- Pb Cups: Press a pb cup into almost cooled cookies. If fully cooled, attach with melted chocolate. Don’t add too soon, to avoid melting the cup.
- White Chocolate: Let the melted white chocolate cool slightly before using. Spread it on quickly and gently tap the cookie on a table to smooth it into a melted snow effect.
- Decorate Quickly: Add the hat, eyes, and nose right after adding white chocolate, as it hardens quickly. Decorate one cookie at a time.
Variations
Switch Things Up
- Store-Bought Cookies: Place a pb cup on store-bought cookies with melted white chocolate, or make Pillsbury® Snowman Cookies.
- Snowman Cupcakes: Make cupcakes with this Cake Mix Cupcakes recipe (any flavor). Add cream cheese frosting, a pb cup, melted white chocolate, and decorate like this recipe.
- Chocolate Snowman Cookies: Use Chocolate Cookies and decorate like this recipe.
- Sugar Snowman Cookies: Use Peppermint Sugar Cookies topped with a halved marshmallow instead of a pb cup. Skip the hat and use mini M&M’s for buttons.
- Add Glitter: Add edible glitter to the cookies for extra fun!
Storage
Melted Snowman Cookies Storage
Store Cookies: Store cookies in a sealed container at room temp for up to 5 days.
Freeze Dough: Drop dough balls onto a sheet pan and freeze until solid. Move to a sealed container or bag and freeze for up to 3 months.
Bake from Frozen: Bake straight from the freezer. Bake a few mins longer until edges are set and centers are soft.
More Fun Holiday Treats
- Mason Jar Christmas Gifts with free gift tags
- Christmas Treats that only has three ingredients
- Peppermint Bark with three types of chocolate
- 6 Easy Christmas Gifts with free gift tags
- Peppermint Fudge with crushed candy canes on top
Melted Snowman Cookies
Equipment
- Parchment paper or silicone baking mat
Ingredients
- 16 tablespoons unsalted butter 1 cup, melted
- 1 cup light brown sugar lightly packed
- 1 cup granulated sugar plus some extra for rolling cookie dough balls
- 1 cup creamy peanut butter see note 1
- 1/8 teaspoon almond extract optional — see note 2
- 1 tablespoon vanilla extract
- 2 large eggs
- 1 teaspoon baking soda
- 1/2 teaspoon salt
- 2-2/3 cup all-purpose flour see note 3
- 12 ounces miniature peanut butter cups 1 bag, unwrapped
- 8 ounces mini peanut butter cups 1 bag; these are even smaller than the miniature ones; they come in a bag unwrapped.
- Orange jimmies sprinkles
- Miniature chocolate chips
- 1 (11-ounce) bag white chocolate chips see note 4
Instructions
- Line a large sheet pan with parchment paper or a silicone liner and set it aside.
- In a microwave-safe bowl, heat the butter until it’s melted. Set aside to cool back to room temperature (hot butter will melt sugars and cause greasy cookies). Once at room temperature, use a spatula to scrape every bit of butter into a large bowl and add brown and granulated sugar. Mix with a large whisk until smooth.
- Add peanut butter, almond extract (if using), and vanilla extract. Mix until combined. Add in 1 egg and mix just until ingredients are incorporated, then add the other egg. Continue mixing until the ingredients are just incorporated. Add baking soda and salt and mix until just incorporated. Add flour and again mix until just incorporated. Don’t overmix.
- Cover the dough and chill for 30 minutes. Preheat oven to 325°F. Scoop the cookie dough and roll into large balls that are each 3 tablespoons in size (don’t make these smaller) and if desired, roll dough balls in some extra granulated sugar. Place dough balls on a lined sheet pan—6 cookies at a time, leaving ample room for spreading.
- Bake for 8–14 minutes. Ever so slightly underbaking the cookies will keep them soft and chewy. (They also bake a bit more on the cookie sheet when removed from the oven). Be careful to not overbake these cookies!
- Remove the cookies and allow them to cool on the sheet pan 5 minutes before removing them to a cooling rack to finish cooling completely.
- When the cookies are almost completely cooled, but not all the way, gently press an unwrapped miniature peanut butter cup into the center of the cookies. Let the cookies finish cooling completely. (If the cookies are fully cool, it’s fine, just attach the Reese’s with melted white chocolate.)
- Once the cookies are completely cooled (you can chill them if you’re in a warm kitchen), melt the white chocolate chips in the microwave. Microwave the chips (don’t add oil or anything) in bursts of 20 seconds, stirring between each burst for 10 seconds until the chocolate is melted and smooth. Using a small spoon, spoon white chocolate over the miniature peanut butter cup. Tap the cookie on the counter a few times, then add another spoonful of white chocolate on top if needed. Again, tap the cookie a few times to get the white chocolate to spread out smoothly.
- Run a very sharp serrated knife under very hot water. Dry and cut off the base of a miniature peanut butter cup. Place some of the melted white chocolate on the bottom of a mini peanut butter cup and attach it to the cut miniature cup. Repeat the process to make more snowman hats.
- Immediately press in the “hat” (see above step) to the top of the “head” of the snowman, then add 2 mini chocolate chips (placed upside down) below the hat and 1 orange sprinkle below the chocolate chip eyes (see note 5). Repeat with remaining cookies. Allow them to harden at room temperature.
Video
Recipe Notes
Nutrition
Nutrition information is automatically calculated, so should only be used as an approximation.




Made some changes to make these a bit smaller, much easier to decorate, and less trouble to stack a batch in a cookie tin:
Used a cookie scoop for a smaller size.
Made a winter scarf by cutting a fruit roll up/tape, rather than make a hat per recipe.
Poured one layer of melted white chocolate for the body, let it cool.
Used frosting to glue a white chocolate melting wafer (for the head) to the body, and poured small second layer of melted white chocolate over the wafer to finish the head.
Placed the scarf around the head, added eyes and nose.
(I had to bake the dough at least 14 minutes, and it was still chewy.)
Thanks so much for taking the time to share this!
yummy! Turned out so cute!
YAY! Thrilled to hear this! Thanks Marcy! 🙂
Awesome recipe!!
Thanks so much Tammi! 🙂
FYI: Your print link is broken and I am unable to print the whole recipe. (It just brings you to another window of the same webpage) Trying to print the webpage results in weird page breaks and missing ingredients/instructions on the printed page.
Hey Heidi! Thanks so much for letting me know; is there anyway you could tell me what browser you’re experiencing the problem in? I can’t replicate it and neither can my developer 🙁 Any details you could provide would be so helpful! Thank you!
Can you freeze them
I’d freeze the rolled cookie dough balls and bake the frozen dough from the oven! I wouldn’t recommend freezing already decorated cookies