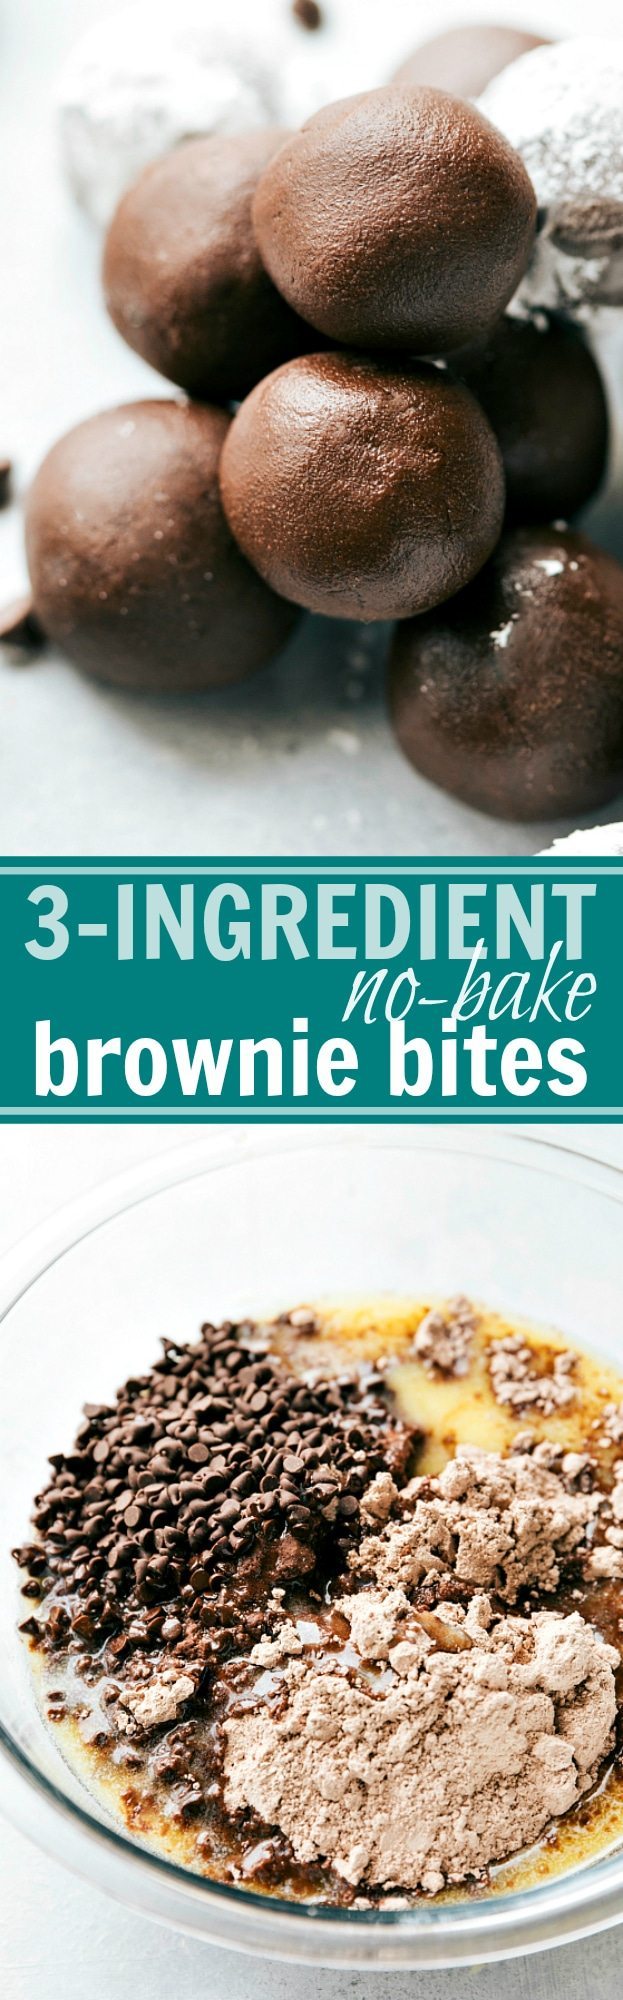
These No Bake Brownie Bites are rich, deeply fudgy, and completely indulgent! The soft, truffle-like filling is dipped in melted chocolate and optionally sprinkled in sea salt (if you like salty-sweet!).
We love all things brownies! Try our homemade Brownie Recipe, Peanut Butter Brownie Bites, or Brownie Oreo Ice Cream Bars next!
. Recipe via ChelseasMessyApron #dessert #best #quick #easy #simple #chocolatechip #seasalt #nobake #brownie #bites")
No Bake Brownie Bites
I was raised on a ridiculous amount of brownies (Thanks, Mom, for sharing so much happiness!). Honestly, my favorite part was always sneaking a few spoonfuls of batter before the brownies made it into the oven.
In retrospect, it probably wasn’t the best idea (eating spoonfuls of batter with raw flour and uncooked eggs). But I’ve lived to tell the tale and create a version without any risk of foodborne illness. These edible brownie bites are egg-free, and I’ll show you how to heat-treat the flour to ensure it’s completely safe to eat.
These incredible nuggets are ridiculously rich—in the best way, of course! They’re fudgy, sweet, and a brownie lover’s dream!
. Recipe via ChelseasMessyApron #dessert #best #quick #easy #simple #chocolatechip #seasalt #nobake #brownie #bites")
Ingredients
- Chocolate Chips & Butter: These form the rich, fudgy base of the brownie bites. Melting them together creates a smooth and creamy mixture. I love semi-sweet in these but use your favorite chocolate.
- Sugar: These sweeten the brownie bites and help achieve the perfect chewy texture. Pack the brown sugar firmly into the measuring cup for accurate measurement.
- Heat Treated Flour: Provides structure to the brownie bites. Heat treating makes sure it’s safe to eat raw. Be sure the flour cools completely before using to prevent clumping.
- Dutch-Process Cocoa Powder: Use Dutch-process for a richer taste and smoother texture.
- Salt: A small amount goes a long way—don’t skip it!
- Heavy Cream & Vanilla: These add moisture and enhance the richness of the brownie bites. The cream also helps bind the ingredients together.
- Mini Chocolate Chips: These provide extra chocolatey bursts throughout the bites.
- Milk Chocolate Chips & Coconut Oil (for Dipping): If the chocolate is too thick for dipping, add a bit more coconut oil to thin it out.
How To Heat Treat Flour
To make safe No-Bake Brownie Bites, you need to heat treat the flour to kill any bacteria. Here are three options:
- Buy pre-treated flour: Look for it on the package.
- Microwave method: Microwave flour in a safe bowl in 30-second bursts, stirring each time. Make sure it reaches 165°F throughout by testing with a thermometer. If not, microwave for another 30 seconds.
- Oven method: Preheat to 300°F. Spread flour on a lined pan and bake, stirring every 1.5 minutes. Check the temperature until it hits 165°F.
Quick Tip
I recommend heat treating the flour for food safety, but the recipe will still work without it. With food safety knowledge evolving and our food supply now global, it’s your choice if you’re concerned about potential foodborne illness.
. Recipe via ChelseasMessyApron #dessert #best #quick #easy #simple #chocolatechip #seasalt #nobake #brownie #bites")
Notes On Heat-Treated Flour
- Let the flour cool completely before using. Hot flour can mess up the consistency. If you’re short on time, cool the flour in the fridge or freezer for a few minutes.
- Break up any clumps with your fingers and throw away any that won’t break apart. Don’t scrape up flour stuck to the pan—it’s likely overcooked and can cause an “off” taste.
- If you see any discolored flour (brown or light brown), discard it, as it can make the batter taste burnt. The heat-treated flour should look just like regular flour—light, fluffy, and white. Only use flour that looks like this to ensure the best texture and flavor.
- Since some flour may burn during heat treatment, make extra. You can save leftovers for other edible dough recipes like edible cookie dough or edible peanut butter cookie dough
How To Make No Bake Brownie Bites
- Melt Chocolate & Butter: Melt chocolate chips and butter in the microwave until smooth.
- Mix Wet Ingredients: Combine the melted mixture with sugars, cream, and vanilla. Beat until smooth.
- Add Dry Ingredients: Mix in heat-treated flour, cocoa powder, and salt. Fold in mini chocolate chips.
- Form Bites: Roll dough into small balls and chill for 15 minutes.
- Dip in Chocolate: Melt chocolate with coconut oil, then dip the chilled bites. Let them set.
- Enjoy: Once set, they’re ready to eat!
. Recipe via ChelseasMessyApron #dessert #best #quick #easy #simple #chocolatechip #seasalt #nobake #brownie #bites")
No-Bake Brownie Bite Tips
- Use Dutch-process cocoa instead of regular cocoa powder. Dutch-process cocoa gives a richer, more intense chocolate flavor, making these bites extra indulgent. Regular cocoa can make the batter drier and less flavorful. Hershey’s® “Special Dark” cocoa powder is a good option and is available in most grocery stores.
- Beat the mixture well to reduce graininess, as the sugar can make the batter a bit gritty. Chilling the rolled brownie bites also helps with this.
- Measure flour carefully. Too much flour will make the bites dry and less flavorful. Spoon flour into the measuring cup, then level it off with the flat side of a knife for accuracy.
Dipping Tips
- Use good-quality chocolate chips like Ghirardelli® or Guittard® for dipping.
- Microwave the chocolate chips in sturdy, heat-safe bowls—not plastic or melamine.
- To prevent burning, microwave in 20-30 second bursts, stirring for 30 seconds between each burst. The chocolate keeps melting even after it’s out of the microwave.
- If the chocolate is too thick for dipping, add a little coconut oil to thin it out. Add it slowly, as too much can make the coating not stick to the truffles.

More Delicious Brownie-Inspired Treats:
- Brownie Trifle with vanilla cream and berries
- Mint Brownies with chocolate ganache topping
- Cosmic Brownies with fudge sprinkles
- Miniature Brownie Bites with a fudgy interior
- Mini Brownie Bites with Rolos soft caramel candies in the center!

No Bake Brownie Bites
Equipment
- Stand mixer or hand mixer
- Silicone baking mat or parchment paper
Ingredients
- 1 cup all-purpose flour heat treated—see note 1
- 1/4 cup Dutch-process cocoa powder see note 2
- 1/2 teaspoon salt
- 1 cup semi-sweet chocolate chips
- 6 tablespoons unsalted butter
- 1/2 cup granulated sugar
- 3/4 cup light brown sugar
- 1/4 cup heavy cream
- 1 teaspoon vanilla
- 1/2 cup mini chocolate chips
- 2 cups milk chocolate chips or semi-sweet or dark, see note 3
- 2 teaspoons coconut oil or shortening
Instructions
- See note 1 for heat treating flour (microwave or oven). Test the flour to ensure it has reached a safe temperature of 165°F. Let the flour cool completely to room temperature before using. Don’t use any burnt or clumpy flour (if it’s off-color or smells burnt, it’s most likely burnt). The flour should should look the same as it did before heat treating. Spoon the cooled flour into a measuring cup and level the top with the back of a table knife. (If you press and scoop flour in the measuring cup, you’ll have too much.)
- Once flour has cooled, add the spooned and leveled flour, cocoa powder, and salt to a medium bowl. Stir to combine and set aside.
- In a microwave-safe bowl, add semisweet chocolate chips and the butter (cut into 1 tablespoon pieces). Microwave in 30-second increments until fully melted, stirring for 15 seconds between each increment. (This takes about 1 min 30 seconds in my microwave.)
- Use a stand mixer or hand mixer to combine the chocolate-butter mixture, granulated sugar, and brown sugar. Beat for 2 minutes on medium speed until completely smooth. Add heavy cream and vanilla and beat until smooth and light, another 1–2 minutes.
- Add the dry ingredients on the wet ingredients. Beat until just combined, being careful to not overmix the batter. Scrape the sides as needed with a spatula to make sure everything is well combined. Fold the mini chocolate chips into the batter with a spatula. (If the dough is too wet, add 1–2 more tablespoons heat-treated flour, and if it is too dry, add 1–2 more tablespoons heavy cream.)
- Use a 1-tablespoon measuring spoon to portion out balls of brownie batter. You should get around 35 balls. Roll into even-sized balls and chill in the fridge, covered, for 15 minutes.
- Line a large sheet pan with a silicone liner or parchment paper. Add chocolate chips and coconut oil to a microwave-safe bowl. Heat in bursts of 20 seconds, stirring between each burst for 30 seconds—a lot of melting is happening outside of the microwave, so take time to stir it to avoid burned chocolate.
- Once the chocolate is completely melted and smooth, coat the truffles in chocolate. I do this by dipping a fork in the melted chocolate and placing a truffle on the dipped fork. Use a spoon to pour melted chocolate on top of the truffle. Carefully tap the fork against the edge of the bowl to allow excess chocolate to fall off the truffle. Then use a table knife to slide the truffle off the fork and onto a parchment-paper-lined sheet pan. (If the truffles aren’t dipping nicely/the chocolate is too thick, add a touch more coconut oil (in very small increments) to barely thin the chocolate a bit more.
- Let truffles fully set at room temperature. These are best enjoyed the same day, but they will last 3–4 days. They freeze better if they aren’t coated in chocolate. I love these chilled and straight out of the fridge—so fudgy!
Video
Recipe Notes
Nutrition
Nutrition information is automatically calculated, so should only be used as an approximation.


Chelsea, these were a hit! I made these for a pot luck last week because I needed something quick after a failed cheesecake attempt. I ran out of butter, and substituted coconut oil for the rest. Rolled and dusted in powdered sugar…they were gone so quickly & it’s been requested that I make them again!!! I called them “truffles”. Wow. A lifesaver for sure!
I love it! What a great idea to call them truffles 🙂 Thanks for the comment Morgan!
I made these with my cooking club at school, and it was perfect! We set out a mix-in/ topping bar of coconut shreds, more chocolate chips, crumbled graham crackers, candy cane dust, crumbled pretzels, and mini marshmallows, and they had a field day. They loved getting their hands dirty and customizing their own bites to keep or give as gifs. Thank you for this simple and fun recipe!
What a fun idea to have all the toppings set up! 🙂 Thank you so much for sharing! I’m thrilled these were a hit Kirsten!
I like fudge like brownies, has anyone tried making these with coconut oil?
SO great to hear you enjoyed these! Thanks so much for the comment 🙂 Love the pictures on your page on this recipe!
These sound amazing! I think I might melt some chocolate and dip these right in. xD
I needed an easy dessert for a church social and these were a hit! I made them with butter and a little coconut oil since I didn’t have enough butter. They were so easy and yummy too! Next time I think I will add some instant coffee too! Definitely a great combo! Thanks for sharing the recipe!
So glad to hear!! Thanks so much for taking the time to leave a comment Amy!! And you are so welcome 🙂
I made these tonight and I love them=]
I used coconut oil instead of butter though. And added two huge spoonfuls of organic peanut butter. Amazing!
These look amazing! I want some right now
What a great dessert idea!
Thank you so much for stopping by Cathy!
Those look dangerously delicious! I’m glad they are in your house and not mine because I’m on a strict diet! 🙂
Haha thank you Eric!