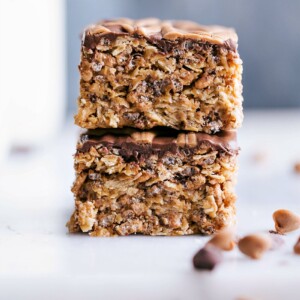
Cereal bars are a delicious, no-bake snack made with crunchy cereal, creamy peanut butter, and natural sweeteners, topped with chocolate, making them the perfect sweet and filling treat!
Use leftover peanut butter in peanut butter granola, lunch lady peanut butter bars, or peanut butter overnight oats.

Cereal Bars Without Corn Syrup
Many cereal bars contain corn syrup and brown sugar, which are okay in small amounts (hi, Scotcheroos), but I aimed to make a more naturally sweetened version. While these bars are definitely still a treat, we’re using primarily honey as the sweetener and they don’t need any corn syrup!
They’re sweet, crunchy, nutty, and full of chocolate. Plus, the classic combo of peanut butter and chocolate never disappoints.
Ingredients
- Honey and White Sugar: These sweeteners bring all the ingredients together and add sweetness to balance the peanut butter. Make sure you don’t boil this mixture to ensure your bars aren’t hard and grainy.
- Creamy Peanut Butter: Use a well-stirred, creamy brand of peanut butter for consistent flavor and texture throughout the bars.
- Vanilla Extract and Salt: Vanilla is optional but both the salt and vanilla can add so much extra flavor to these bars.
- Rice Krispies Cereal or Honey-Roasted Cheerios: Either works in this recipe, and both are so delicious! If you have younger kids eating these, the rice krispies are a little easier to bite into!
- Optional Topping: Mix chocolate and peanut butter and heat them up slowly in the microwave, stopping often to stir. This makes a tasty topping for the bars.
How To Make Cereal Bars
- Prepare Pan: Grease a 9×13-inch pan and line it with parchment paper that hangs over the edges.
- Cook Honey and Sugar: In a large pot, mix honey and sugar. Heat on medium-low until it starts to simmer, but don’t let it boil. Let it simmer for 1 minute, then remove from heat.
- Add Peanut Butter and Cereal: Quickly stir in peanut butter, vanilla, and salt until smooth. Fold in the cereal until well coated.
- Press into Pan: Transfer the mixture to your prepared pan. Spread it out evenly and press down lightly.
- Add Topping (Optional): If using, melt chocolate chips and peanut butter in the microwave, stirring every 15 seconds until smooth. Spread this over the cereal base. You can sprinkle a little sea salt on top if you like.
- Chill and Serve: Cover the pan and refrigerate until firm, about 1-2 hours. Lift out using the parchment paper, cut into squares, and enjoy!
More Snack Recipes:
- Chocolate Energy Bites with oats and peanut butter
- Almond Granola with coconut oil
- Protein Breakfast Cookies cinnamon roll flavored
- Yogurt Bowl with 8 recipe different ideas
- Trail Mix with 5 recipe variations
Cereal Bars
Equipment
- Baking pan 9 x 13-inch, lined
Ingredients
- 1 cup honey
- 1/2 cup sugar
- 1 cup creamy peanut butter
- 1 teaspoon vanilla extract optional
- 1/8 teaspoon salt
- 5-1/2 cups Rice Krispies cereal or honey-roasted Cheerios
Optional Topping
- 2 cups chocolate chips
- 2 tablespoons creamy peanut butter
- 1/16 teaspoon Maldon sea salt flakes
Instructions
- Lightly grease a 9×13-inch baking pan and line it with parchment paper leaving an overhang.
- In a large pot, combine honey and sugar. Heat the mixture over medium-low heat, stirring frequently, until it begins to gently simmer—look for small bubbles forming around the pot's edges, but be careful not to let it reach a full boil. Allow these small bubbles to simmer for exactly 1 minute, then quickly remove the pot from heat.
- Working quickly, add 1 cup peanut butter, vanilla extract, and salt to the pot, stirring until smooth. Fold in the cereal, gently, until all the cereal is really well coated.
- Transfer the mixture to the prepared pan. Using a silicone spatula, spread evenly, and lightly press down to secure in the pan without compacting it too firmly.
- In a microwave-safe bowl, combine the chocolate chips and 2 tablespoons of peanut butter. Melt in the microwave in 15-second bursts, stirring between each burst, until smooth. Spread the melted chocolate evenly over the cereal base. Optionally, sprinkle a tiny amount of salt over the chocolate.
- Cover the pan and refrigerate until firm, about 1-2 hours. Using the overhanging parchment paper, lift the entire block from the pan and cut into squares.
Recipe Notes
Nutrition
Nutrition information is automatically calculated, so should only be used as an approximation.


sleangry is SO real to me, love it!!! these cereal bars look sooo sinful and incredible Chels, love!
Oh my gosh I’m dying at how good these look. MAJOR drool fest going on here!
Oooh wow! These look so yummy. Perfect little snack to take to work!
These cereal bars are absolutely gorgeous, Chelsea! And I know August is going to be super gross and humid in NJ so anything “No Bake” is immediately added to my must make list. 😀
Chelsea, This looks scrumptious! Since subscribing to your blog, I think I have pinned almost every one of your recipes! You have such a gift for picking them, and your photos are gorgeous!
These look absolutely gorgeous and that bit different from other no bake cereal bars. I really hope I get to try them soon =)
These sound so delicious! Can’t believe they are no bake!
How do.you store them cause they look amazing and would love to make them for back to school. Do they need to be in the frig
You can store them in the fridge or out on the counter – just make sure they are in an airtight container or sealed ziplock bag.
These look delicious! My little guy would love these. These would be great for a back-to-school lunch dessert!
Thanks Michele!
awwww your hubby and you sound like so much fun!! I think we should double (I mean it! 😛 You can also bring the baby. We adore babies! That sounded weird. We’re not weird I swear! Well…we’re weird but not like WEEEEIRD…ok…anywayyyyy)
LOVE these cereal bars-I would want this for breakfast and for so many snacks! I def. think the choc and pb are necessary, but that’s me 😛
Haha I totally agree!! A double would be SO fun! And we’d obviously have to get your autograph 🙂