This simple Cut-Out Sugar Cookie Recipe is my go-to when using a cookie cutter! A simple but delicious cookie recipe with stunning results and minimal hands-on or chilling time. Plus, the sugar cookie icing is easy to work with and so tasty (unlike a lot of royal icing recipes.)
This post includes a video tutorial and step-by-step photos to help you be successful in decorating beautiful sugar cookies — even if it’s your first time.
Not looking for a Cut Out Sugar Cookie Recipe? Try these super chewy and Soft Sugar Cookies or these Sugar Cookie Bars instead.
The BEST Cut-Out Sugar Cookie Recipe
Few things beat a super soft and chewy Brown Sugar Cookie, but as far as a cookie recipe that can be cut out and maintains its shape, this recipe is the best! These cookies not only hold shapes really well, but they also don’t require loads of hands-on preparation or chilling time. They’re soft with slightly crisp edges, perfectly sweet, and have a wonderfully nuanced flavor.
By adding just two “secret” ingredients: ground cardamom and the zest of an orange (or lemon), we heighten the flavor of these cookies, adding a wonderful freshness and vibrancy to the flavor.
What Is The Trick To Cut-Out Cookies?
There are so many tips and tricks to perfecting Cut-Out Sugar Cookies, but here are my top tips:
- Roll out the dough on wax paper or plastic wrap. This serves a couple of purposes: first, the dough won’t warm and stick to the counter, and second, the wax paper can be lifted from the counter to coax the cut-out shape off nicely.
- Freeze the dough. Instead of spending hours chilling, I like to pop the dough in the freezer for a quicker chill.
- Tap the cookie cutter in flour. Simply tap the cutter in a bowl of flour before each cut. This will help it cut into the dough without sticking.
Cut-Out Sugar Cookie Ingredients
Cut-Out Sugar Cookie recipes have fewer ingredients, so the better the ingredients, the better the results will be. Here are our top ingredient tips (certainly not requirements, but ways to elevate your cookies’ flavors):
- Sugar. I have a big container of sugar that I store vanilla beans in. This really heightens the flavor of the sugar.
- Butter. The better the butter, the richer the flavor. I love Challenge® Butter. Choose unsalted to have perfect control over the amount of salt in the dough.
- Fresh baking powder. Check to make sure the baking powder is fresh.
- Cornstarch. This ingredient helps the cookies hold their shape better as well as keeps them nice and soft.
- Vanilla. These cookies definitely benefit from vanilla bean paste which adds more flavor than liquid vanilla. That said, vanilla extract also works well. Just make sure to use a pure vanilla extract for maximum flavor.
- Optional ingredients: Citrus zest and ground cardamom. These two ingredients are optional and can be left out if you want a “pure” recipe. That said, we love these cookies with those two ingredients — they add vibrancy and flavor!
How Do You Get Cut-Out Cookies To Keep Their Shapes?
- Keep the dough as cold as possible at all times.
- Cut out thick (1/2-inch) shapes.
- Chill the dough. The longer the fat (butter) stays solid, the less the cookies will spread. Additionally, the sugar has a chance to absorb more liquid and further prevent spreading.
- Chill it twice. The dough is easier to roll out and cut if it has been chilled for a little. Next, we recommend chilling again — chill the cut-out shapes (on the tray) before baking. This is a game changer for helping cookies keep their shape and avoid the dreaded spread.
Let’s Chat Icing
I have tried every icing to top sugar cookies — from meringue powders to egg whites and I’m here to tell you this one is not only the tastiest, but it’s also the easiest and most foolproof!
Here are some tips:
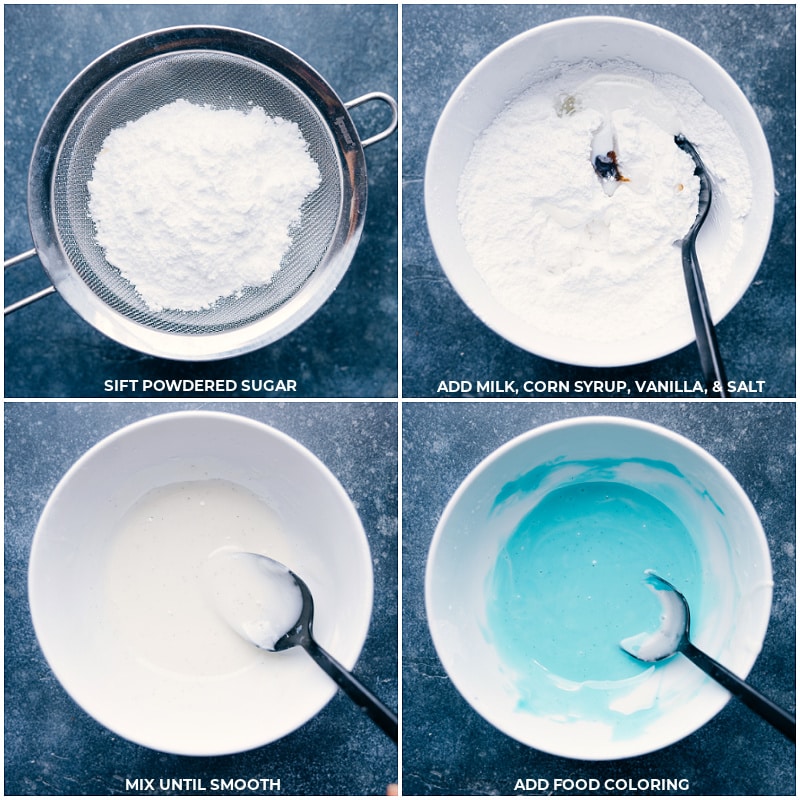
- Sift powdered sugar to keep clumps and bumps out of the icing (prettier cookies!).
- Don’t frost warm cookies. In fact, we think it’s best to chill the baked cookies in the fridge before icing them.
- Mix up the extract. Feel free to swap vanilla for a different flavor (almond, lemon, orange, etc.) to change the icing flavor.
- Keep the extract to a minimum. Much more than a few drops (1/4 teaspoon) of extract and your icing will taste off.
Cut-Out Sugar Cookie Tools
The following tools make the process so much easier:
- Silicone liner or parchment paper
- Extra-large (15×21) inch sheet pan (Fitting more cookies on a tray means less overall baking time!)
- Sieve
- Squeeze bottles (easier “flooding”)
- Piping tips (or just cut the tip of the bags off with scissors)
- Piping bags
- Rolling pin
- Rubber spatula
Quick Tip
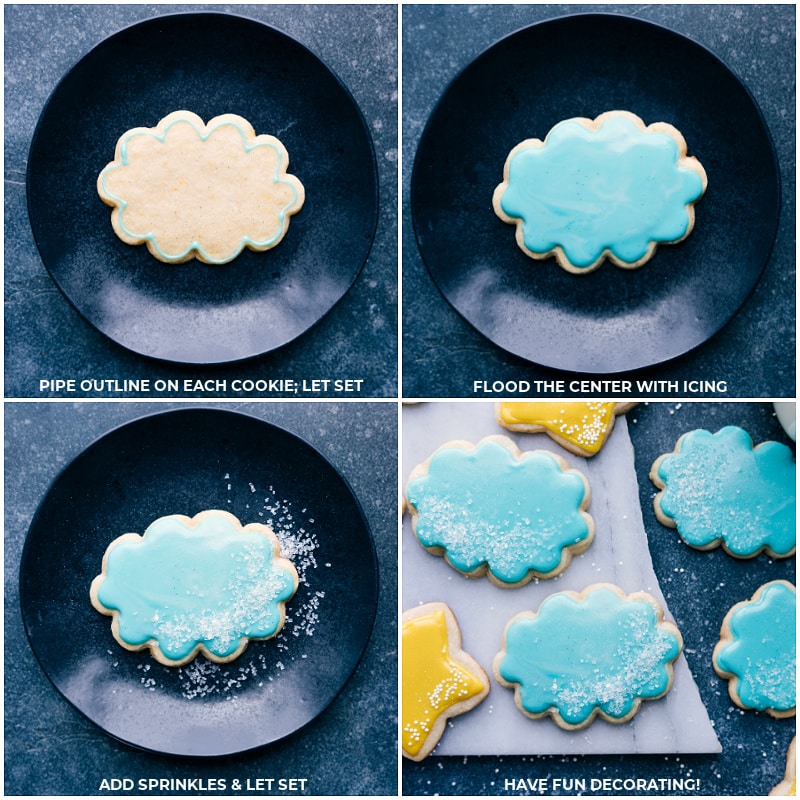
What is flooding? After you have outlined the cookie (and it has dried) you then “flood” the cookie with the remaining icing. This gives the cookie a smooth and glossy finish. Once the flooding has dried, you can pipe on more details to the cookies.
Cut Out Sugar Cookie Recipe FAQs
We like them on the thicker side — about 1/2-inch thick. This way they’ll have nice crisp edges but an ultra-soft and chewy interior.
Most likely they’re hard because they were over-baked.
Remove the cookies when they’re ever so slightly colored at the edges and have set in the middle, but no longer! (Err on the side of slightly under-baking.)
Drop cookies get their name by “dropping the dough” into balls on a baking sheet and then baking.
Cut-out cookies are made by first rolling out the dough and then using cookie cutters to cut out shapes.
Likely because the butter and sugar was over-creamed. If too much air gets whipped into the dough you’ll end up with a fluffy/puffy texture, Don’t overdo it when creaming together the butter and sugar!
A few likely culprits:
- Flour was under-measured (not enough flour in the dough)
- Dough wasn’t sufficiently chilled
- Too much butter and sugar
Storage
How Far In Advance Can You Make Cut-Out Cookies?
One of my favorite things about this recipe is that it can be made months in advance! Bake the unfrosted cookies, freeze them on a sheet pan, then transfer to an airtight bag or container with layers separated by wax or parchment paper. Thaw at room temperature and frost fresh. Stored properly, they’ll last 3-6 months in the freezer.
Fresh sugar cookies are best enjoyed within 3-5 days of being made. (We like them best the first couple of days.)
More Cookie Recipes
- Peanut Butter Cookies with a chocolate coating
- The BEST Chewy Chocolate Chip Cookies with pure maple syrup in the dough
- Snickerdoodles with a cinnamon-sugar coating
- Cake Batter Cookies with actual cake batter and sprinkles
- Salted Caramel Cookie Bars with sea salt

Cut Out Sugar Cookie Recipe
Equipment
- Stand mixer fitted with whisk attachment, or hand mixer
Ingredients
- 16 tablespoons unsalted butter 1 cup, see note 1
- 1 cup + 2 tablespoons granulated sugar
- 1 large egg
- 1 teaspoon vanilla bean paste or 1-1/2 teaspoons vanilla extract, see note 2
- 1 large orange for zest, optional
- 1/2 teaspoon ground cardamom optional
- 1 teaspoon cornstarch
- 2 teaspoons baking powder
- 3/4 teaspoon salt
- 2-3/4 cups all-purpose flour
- 1 cup powdered sugar sifted
- 1 tablespoon whole milk plus some extra may be needed
- 2 teaspoons corn syrup
- 1/8 teaspoon vanilla bean paste or 1/4 teaspoon vanilla extract, optional
- Sprinkles optional
- Food coloring optional
Instructions
Cookies
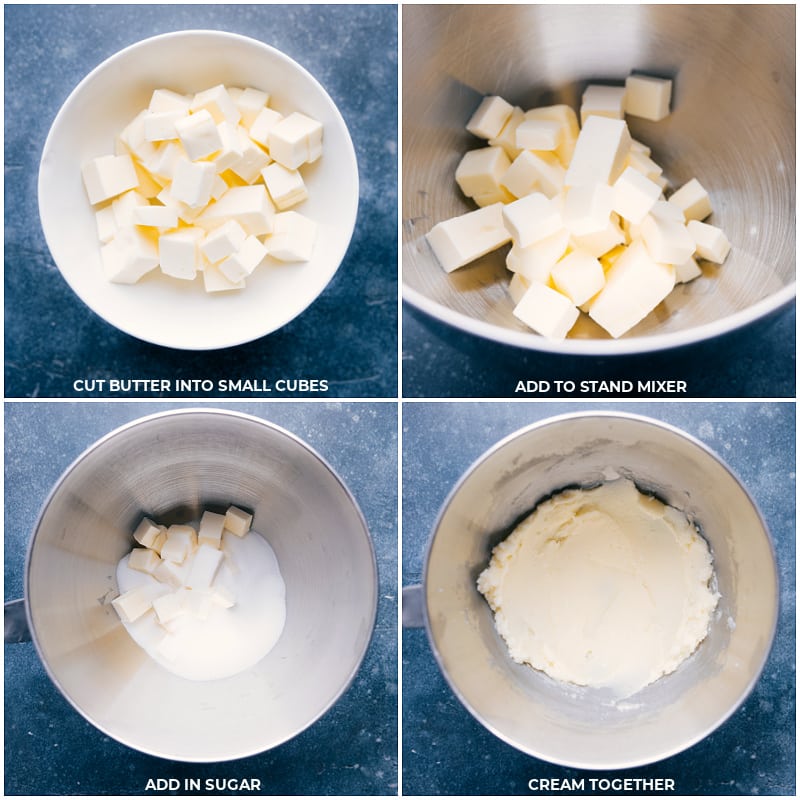
- Cut the very cold (right out of fridge) butter with a sharp knife into 1-inch cubes. Place butter cubes in a stand mixer (fitted with a whisk attachment) with the granulated sugar. (Or use a large bowl with a hand mixer.) Beat until completely creamy and light, about 2–4 minutes. Scrape the edges as needed.
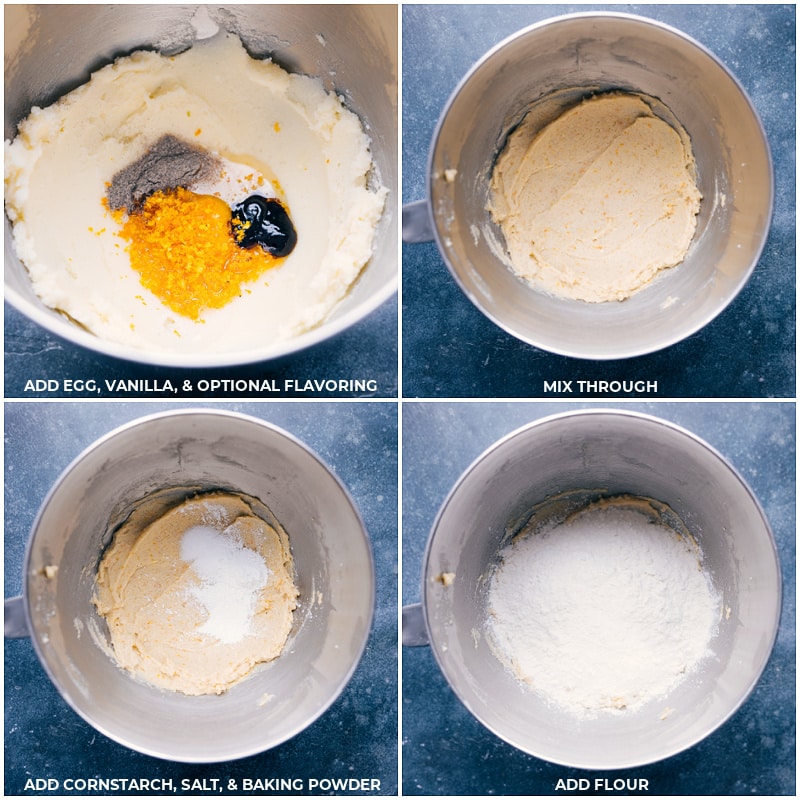
- Add in the egg, vanilla bean paste, zest of an orange, and ground cardamom (if using). Beat until integrated.
- Add in cornstarch, baking powder, salt, and flour. Beat until completely combined and a thick smooth dough forms, stopping to scrape the edges of the bowl as needed.
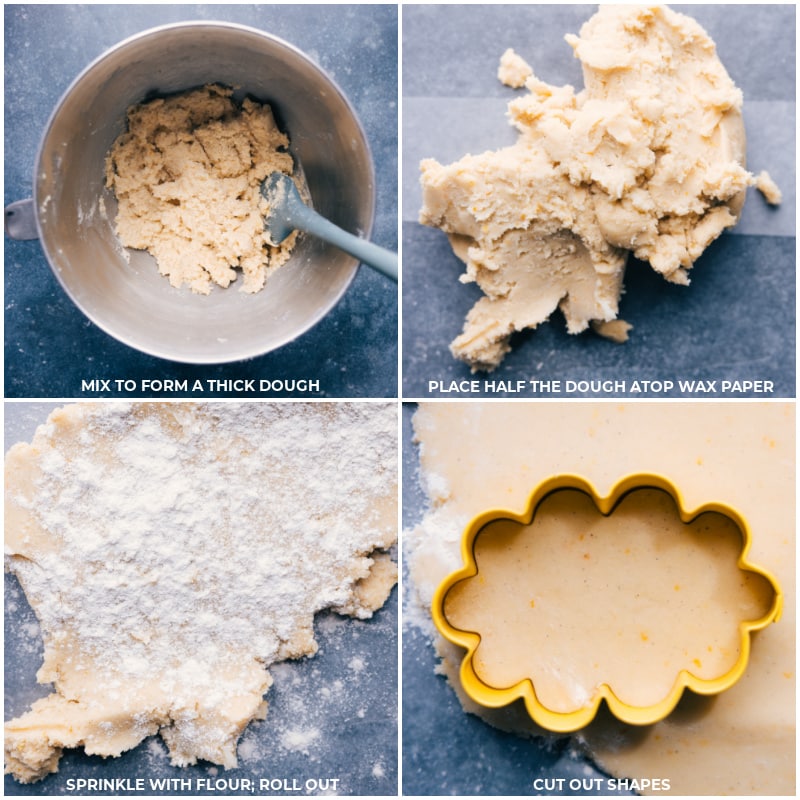
- Even though the dough may seem like it won’t come together (and looks like crumbles), keep beating until a dough forms. Be careful to not overbeat the dough once formed; that leads to tough cookies. Divide the dough in half and place half back in the bowl in the fridge (see note 4).
- Preheat the oven to 350°F (176°C).
- On a large, clean workspace, place a large sheet of wax paper or plastic wrap down. Place the other half of the dough on top of the wax paper and lightly sprinkle with a bit of flour. Roll the dough to 1/2-inch thickness (important to have the right thickness for soft and chewy sugar cookies).
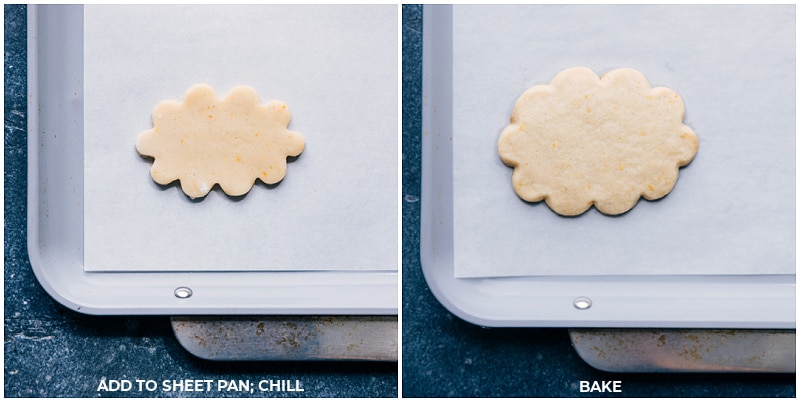
- Once rolled out, cut shapes using the cookie cutters. Tap the cutters in flour if you find them sticking to the dough. Then, use the wax paper to gently pull the cookie off the counter and place it on a parchment or silicone-lined tray. Place tray in the fridge, uncovered, and chill for 30 minutes. (Or freeze the tray with cookies for 15 minutes.) Repeat with the dough in the fridge.
- Bake 1 sheet pan of cookies at a time for 10–14 minutes, watching carefully for when they turn slightly brown at the edges/bottom. Be careful to not overbake; the center should still look soft (but not gooey) and should not be browned at all. Slightly underbaking is hugely important for the flavor and texture of these cookies.
- Remove cookies and allow to cool/set on tray for 5 minutes before removing to a cooling rack to fully cool. (I chill cookies in the fridge before icing to ensure they are super cold.)
Sugar Cookie Glaze (see note 3)
- Use a sieve to sift the powdered sugar into a bowl. Add milk, corn syrup, tiny pinch of salt, and vanilla (if using). Mix with a spoon until a thick and smooth frosting forms. (Too thick? Add a teeny bit more milk. Too thin? More powdered sugar.) Separate into bowls for different colors or dye one color.
- Transfer frosting to a clean plastic piping bag and cut a tiny bit off the very tip (or use a #3 piping tip). Pipe the frosting on completely cooled cookies, tracing the outline of the cookie with a thin line of frosting. Repeat for all the cookies. Let stand to harden.
- Then cut off more of the piping bag (or transfer the remaining icing to a squeeze bottle) and “flood” the cookie with the frosting, pressing out frosting so it runs into the piped lines, filling in the gaps. Gently tap the cookie on the counter to remove bubbles or pop bubbles with a toothpick. If adding sprinkles, add before the frosting sets.
- Let completely set at room temperature, about 30 minutes. (But don’t stack cookies; sometimes the icing can be soft and pick up impressions for about 24 hours). Once icing has set, you can add more details to the cookies with new icing if desired. Store in a single layer at room temperature in an airtight container.
Video
Recipe Notes
Nutrition
Nutrition information is automatically calculated, so should only be used as an approximation.





I tried your recipe a year ago and have been a fan ever since . Made these a dozen times over following your recipe to the tee and they have never failed.. thanks so much for sharing !!
Ahh this means so much! Thank you! 🙂
Am making these today with a couple of adjustments. Excited to see how they turn out. Thanks for all your work on your recipe.
I added orange zest (1 Tbs) instead of orange extract, so we’ll see. Dough favor is great!
I added 3 cups of flour total as the dough seemed sticky with just 2 3/4 C.
Given the time required for completing the dough part, I had to put into the fridge when my baby woke up, so I’ll have to see how the rolling, cutting and baking turns out.
I am making these for next Saturday, so I’ll freeze baked cookies until the the night before.
Wonderful! I’m excited to hear how they turn out for you 🙂 The zest sounds delicious — definitely trying that sometime!
YAY!!!! I have NEVER EVER made cookies from scratch and I am so glad your recipe was the first one I decided to try. I DON’T NEED TO GO TO ANOTHER RECIPE THIS IS IT!! THANK YOU!!!! Thank you so much for sharing!! I made the cookies and let them sit covered over night and today I will decorate them. I will make some of your frosting today and decorate some with my 3 year old. But I want to try to make a frosting that I can flood the cookie with … do you have any suggestions on making the icing runny enough to flood? I found one online that is just powder sugar and egg whites but I wonder if this will be too sweet. Oh guru, what your thoughts are here?!
I’m so thrilled these were a huge hit! 🙂 Thank you so much for the comment Amanda!
I’ve made these many times – this is now my go to recipe for sugar cookies 🙂 The flavor is amazing and they keep their shape perfectly. They’re always a hit! Thank you so much for making this recipe!
I’m so thrilled to hear this is your go-to recipe!! 🙂 Thank you so much Jasmine! 🙂
Do the Sugar Cookies retain their shape when using detailed cut out cookie cutters. I have to make Longhorn (UT) cookies and want to make sure they will hold their shape and I can still decorate with a smooth (not royal) icing.
Yes they hold their shape really well! 🙂
What size cookie did you bake for 12 minutes? Also, can you decorate and use these for cookie pops? These look so good. If you can, could you share a recipe for frosting that gets hard? Thank you very much.
Yes you can definitely make some cookie pops with this! I would just recommend cutting them quite a bit smaller 🙂