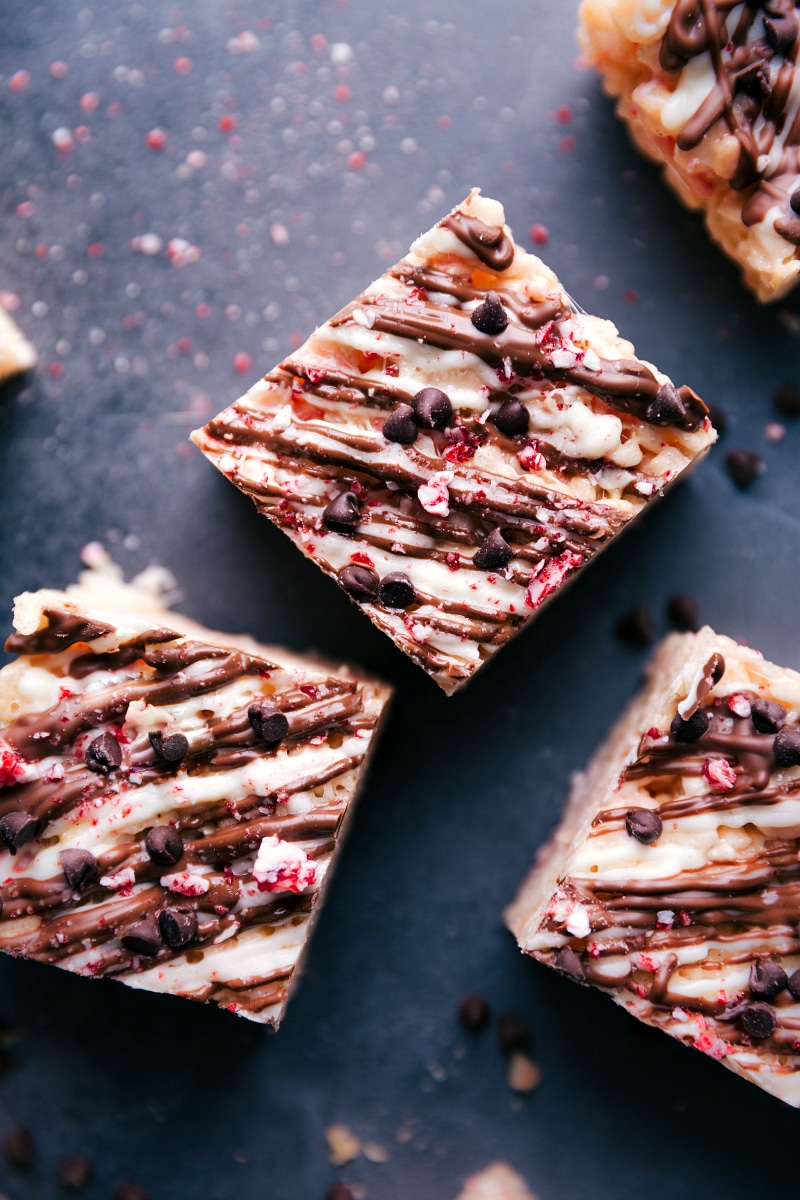
These holiday Peppermint Rice Krispies Treats are easy to make and flavored like the best candy of the season — peppermint bark! These bars have peppermint candy mixed in the bars and are drizzled with two kinds of chocolate!
Be sure to save these delicious variations for when peppermint bark is no longer in season: Scotcheroos, Chocolate Rice Krispies Treats, or Fruity Pebbles Rice Krispies Treats.
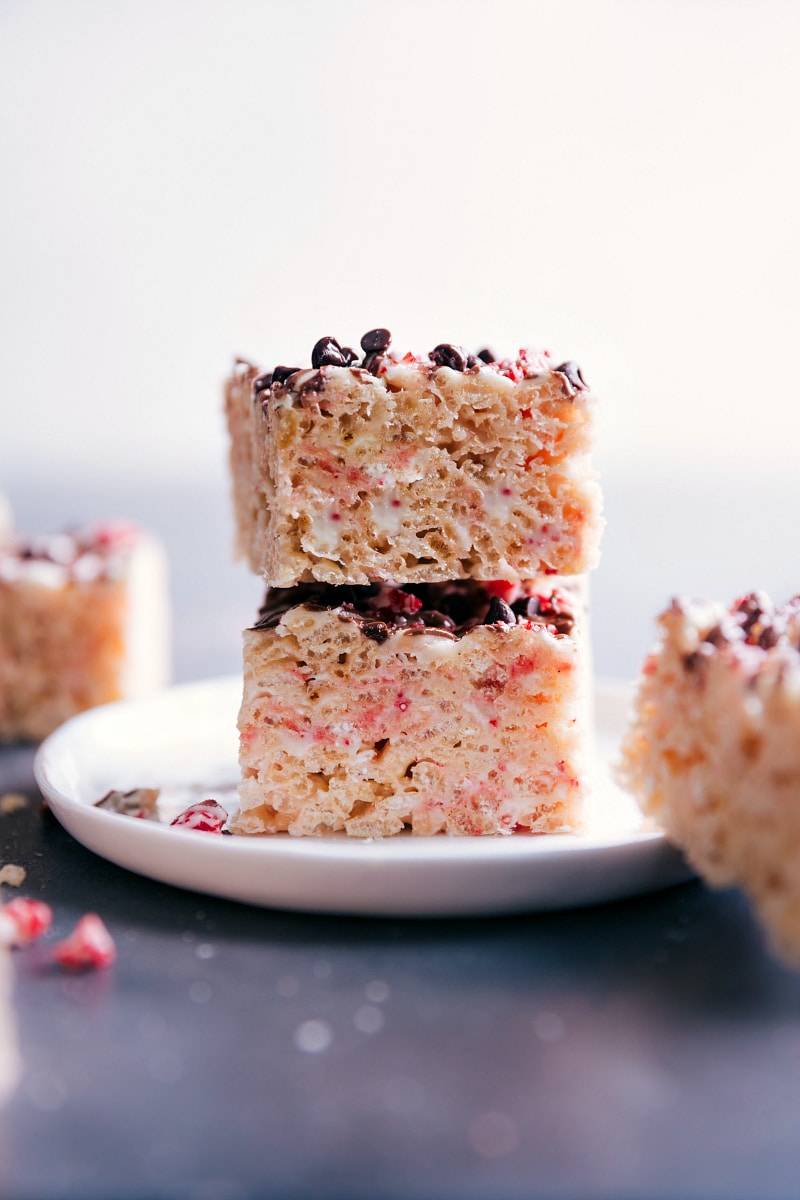
Peppermint Rice Krispies Treats
When a sweet reader emailed me to share a peppermint version of her favorite Rice Krispies Treats, I immediately added it to the top of my list! Of course there is a need for a holiday Krispies treat!
And these do not disappoint! They’re not only topped with two kinds of chocolate, they’ve even got chocolate candies mixed into the cereal mixture, which get melted and integrated throughout the bars. Of course, they’ve also got crushed peppermint mixed into the bars and peppermint extract to make them extra minty and delicious.
If you love Rice Krispies treats and you like peppermint bark, you are in for a new holiday favorite! Note: Rice Krispies is a trademarked product of The Kellogg Company. When making this recipe, feel free to use any brand of crispy rice cereal.
Let’s talk about the peppermint in these bars
We’ve got crushed candy canes, peppermint chocolate kisses, and peppermint extract in these bars. Below, I’ll break down each component:
- Candy canes or hard peppermint candies: I’ve found the easiest way to evenly crush the candy is with a mini food processor. I like this one in particular. A small powerful blender also works. (See quick tip below if you don’t have either.) We want these candies to be very finely crushed, so they’ll integrate better and not create unpleasant bites of hard candy.
- Peppermint chocolate kisses: Also known as candy cane kisses! These chocolate kisses are a favorite holiday candy of mine; they’ve got a smooth white creme with tiny bits of crunchy peppermint candy — they’re so good! They melt down a bit in these Krispies treats, adding a delicious richness and creaminess to the bars.
- Peppermint extract: Make sure to grab peppermint, not mint extract; the mint flavor will make these Peppermint Rice Krispie Treats taste like toothpaste! I have nothing against toothpaste, but I don’t want that flavor in my treats! The actual strength of the peppermint extract will also depend on the brand (some are more potent than others), so be sure to taste and adjust to personal preference, adding more for a stronger peppermint flavor.
Quick Tip
No food processor or blender? No problem! Add the unwrapped peppermint candies to a large plastic bag (or two; the peppermint has a tendency to rip through plastic bags as it is crushed), seal the bag without air in it, and then crush with a rolling pin or meat mallet until fine crumbs are formed.
Peppermint Rice Krispies Treat tips
- Prepare all the ingredients (but not the drizzling chocolates) before starting. Once these treats get going, they move quickly. I recommend lining the pan, crushing the peppermint, unwrapping the kisses, and measuring out the cereal before getting started.
- Use extremely FRESH marshmallows. The fresher the marshmallows, the softer and more enjoyable these treats turn out. When purchasing marshmallows, feel the bags to find the softest marshmallows.
- Keep the heat low. When marshmallows are exposed to high heat, they harden and that will make your bars hard. Keep the heat as low as possible, let them gently melt, and remove the marshmallows as soon as they’re melted. Remember to stir constantly as the marshmallows melt down.
- Avoid compressing. Don’t push the mixture into the pan. Instead, place it in the pan and gently press it down. The less compacted the bars are, the better they taste and easier they are to eat.
How do you keep Peppermint Rice Krispies Treats from sticking to your hands?
The secret here is cooking spray! Pour the mixture into the pan and then give both your hands a quick spritz with cooking spray (we like coconut oil-based cooking spray best, but any will work). Then, gently press the bars in and watch the magic happen — nothing will stick to your hands! Another option: slip your hands into plastic baggies and apply cooking spray for less cleanup.
Storage
These Peppermint Rice Krispies Treats are best (texture and taste-wise) within the first couple of days; we like them best on day one. Store the bars in an airtight container at room temperature.
Freezing and thawing these bars affects the texture, and the chocolate will thaw and be grainy, so I don’t recommend freezing these bars.
More holiday treats
- Christmas Snack Mix with a white chocolate drizzle
- Peppermint Bark Muddy Buddies with chopped peppermint bark candies
- Christmas Mason Jar Gift Ideas four Mason jar ideas
- Sugar Cookie Snack Mix with sugar cookie candies
- No-Bake Peppermint Cheesecake with a chocolate cookie crust
Peppermint Rice Krispies Treats
Equipment
- 9 x 9-inch baking pan
- Parchment paper or aluminum foil
- Small blender or food processor
Ingredients
- Cooking spray
- 5 tablespoons unsalted butter
- 1 (16-ounce) bag miniature marshmallows divided
- 1/4 teaspoon salt
- 1 teaspoon vanilla extract
- 1/2 teaspoon peppermint extract not mint
- 6 cups crispy rice cereal such as Rice Krispies
- 4 peppermint sticks unwrapped and crushed, 1/4 cup, plus 1 to top bars with
- 20 candy cane kisses unwrapped
- 1/2 cup white chocolate chips or use milk, semi-sweet, or dark chocolate
- 1 teaspoon vegetable oil divided
- 1/2 cup milk chocolate chips
- 1/4 cup miniature chocolate chips optional
Instructions
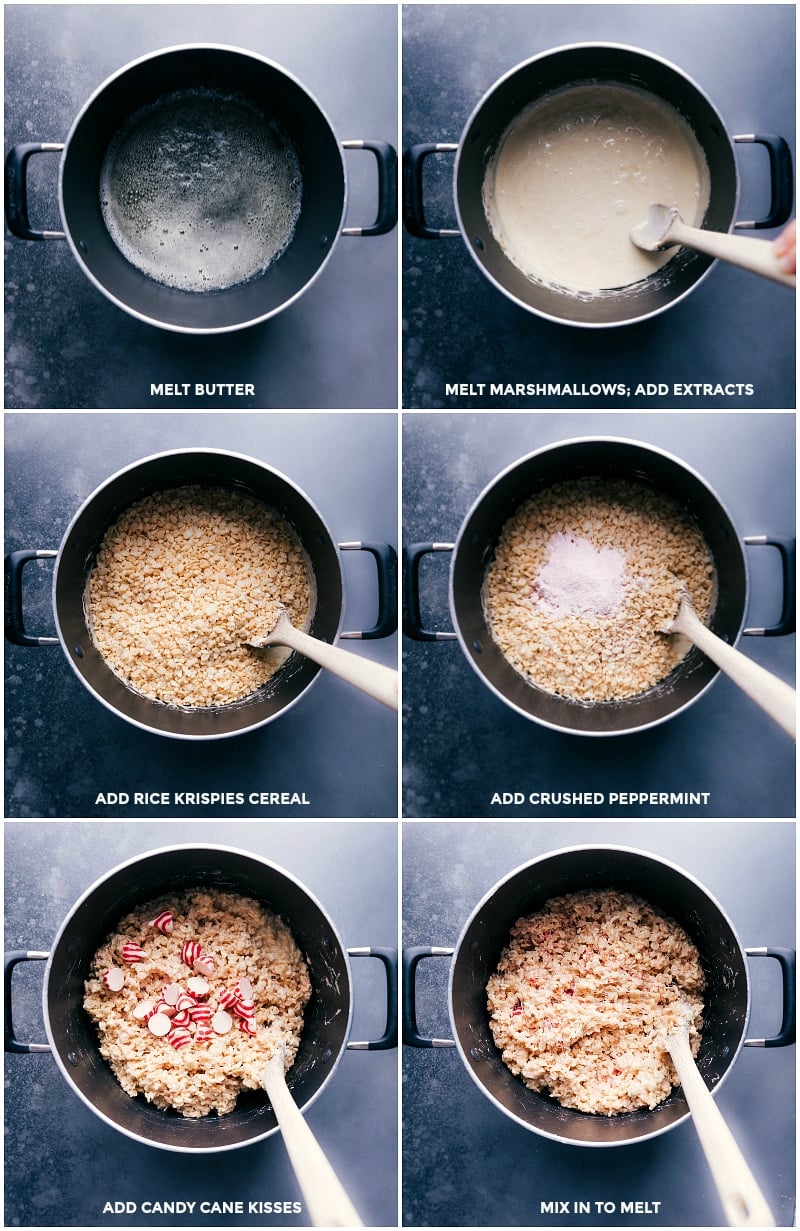
- Line a 9x9-inch pan with parchment paper (or foil) with an overhang; lightly spray with cooking spray and set aside. Measure out cereal and set aside. Unwrap candy canes and add them to a small blender or food processor. Pulse or chop until candy is very finely crushed into a powder. Set aside. Unwrap kisses and set aside.
- In a large pot, melt butter over medium-low heat, stirring occasionally. As soon as butter is melted, reduce heat to low. Add 8 cups (339g) of the mini marshmallows. Stir constantly until marshmallows are just melted.
- Immediately remove from heat and stir in salt, vanilla extract, and peppermint extract. Add cereal and crushed peppermint. Stir to coat in the marshmallow mixture. Once well coated, pour in the rest of the marshmallows (2-1/2 cups). Stir. Add in unwrapped peppermint kisses and stir to mix them in; they will get melty (this is intended).
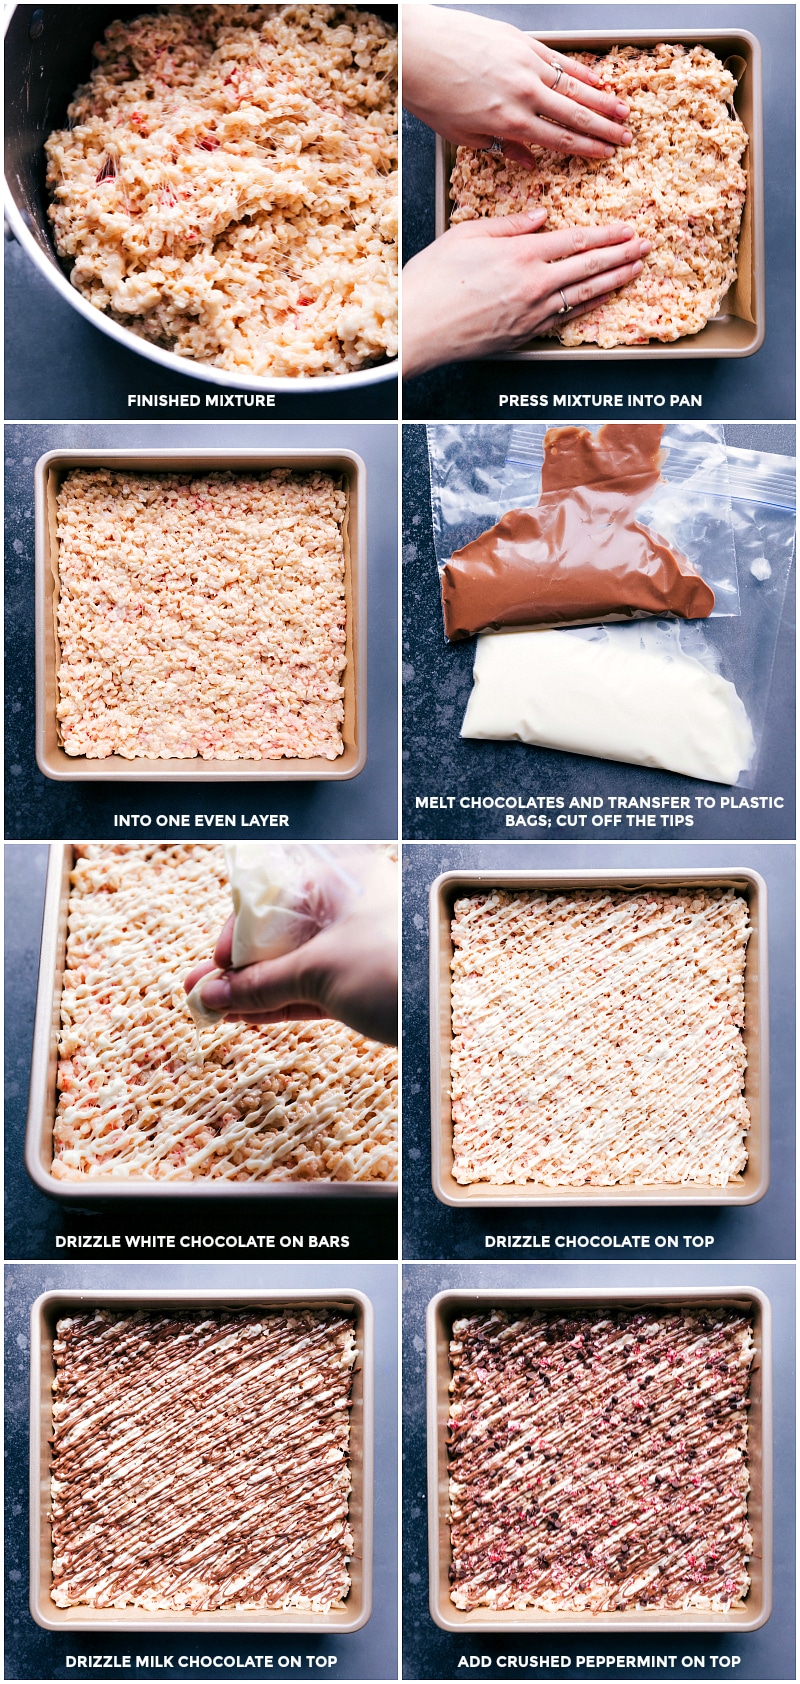
- Pour the mixture into the prepared pan. Lightly spritz your hands with cooking spray and press the mixture gently into the prepared pan. Don’t press too hard or you’ll get a dense/harder treat. Set aside to cool about 10 minutes.
- Meanwhile, add white chocolate and 1/2 teaspoon vegetable oil to a microwave-safe bowl. Microwave in bursts of 15 seconds, stirring between each burst for 10 seconds until chocolate is melted and smooth. Transfer melted chocolate to a plastic bag, cut off the tip, and drizzle evenly over the bars. Repeat with the milk chocolate and remaining 1/2 teaspoon vegetable oil (melt and drizzle over bars). If desired, add the last crushed peppermint stick (see note 1) and mini chocolate chips and allow the chocolate to harden at room temperature, about 30 minutes to an hour.
- Use the parchment overhang to pull the bars out from the pan. Use a sharp knife to make cuts. (Run a knife under hot water, then dry with a towel for easier cutting.) These bars are best enjoyed the same day.
Video
Recipe Notes
Nutrition
Nutrition information is automatically calculated, so should only be used as an approximation.





Love this recipe, so creative. Thank you!
I am so thrilled to hear this!
These look great
Thanks so much Tracy! 🙂
You have one of the most wonderful websites to show so many neat things to do with mason jars and I’m sure a ton of other ideas.
Thank you, Gina
Thanks so much Gina! 🙂
This was a HUGE success for Christmas goodies (family members said I ate more than they did, hahaha. I did double the recipe because I knew we would want MORE and it worked out great in a 9x`12 pan just not as thick but still delious!! Love your site and as you can tell in my recipe box I have lots of yours saved. Once my new printer hooked up I will be able to print some to make room for more. I have even been sharing them with my granddaughters.
Vicki R
Yay! I am so beyond happy to hear this! Thanks so much for your support Vicki! 🙂
These were so good! thank you!
I’m so happy to hear! Thanks Jen! 🙂
Hi…I just finished making these and I am an experienced cook but I have to admit I was a bit confused by the ingreds. and instruction as written re: the topping. I figured it out but I did not have the mini choc. chips for the topping because I didn’t read them as being sperate. All is fine…and next time maybe I should read more carefully
I love your site and recipes.
Vicki, Wisconsin